 Documentation
Here you will find an overview of the most important areas of the website – including login and features for camera owners.
Version: 2 | Date: 10.03.2026
1. Overview
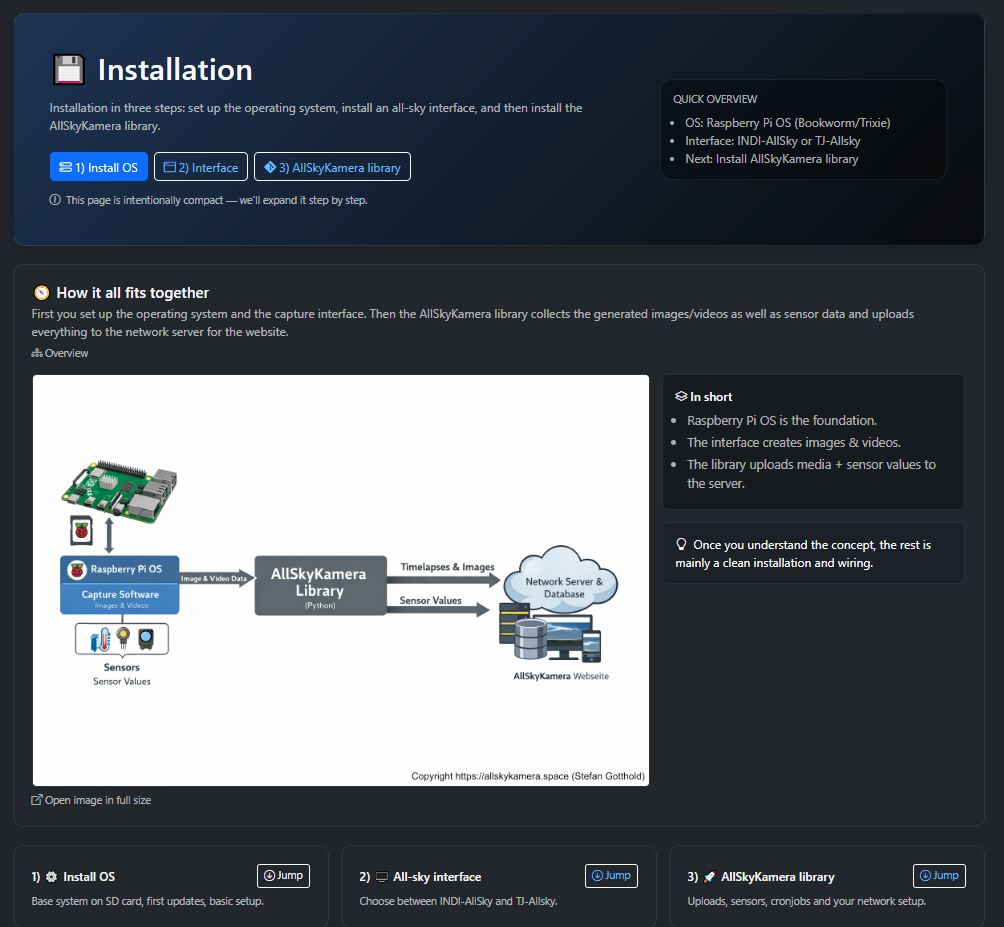
AllSkyCamera is a collaborative network of all-sky cameras, keograms and sensor systems. The goal is to observe the night sky long-term, document it and make the data openly accessible.
The AllSkyCamera network connects many private all-sky cameras worldwide. Each camera continuously provides images of the night sky and makes them publicly accessible.
In addition to images, sensor data such as temperature, humidity or sky brightness (SQM) are also recorded. These data help to better understand observation conditions.
From the images, keograms, startrails and timelapse videos are automatically generated to visualize long-term developments in the sky.
The project is driven by an open community of camera operators, developers and observers who collaboratively improve hardware, software and analysis.
2. Public Areas
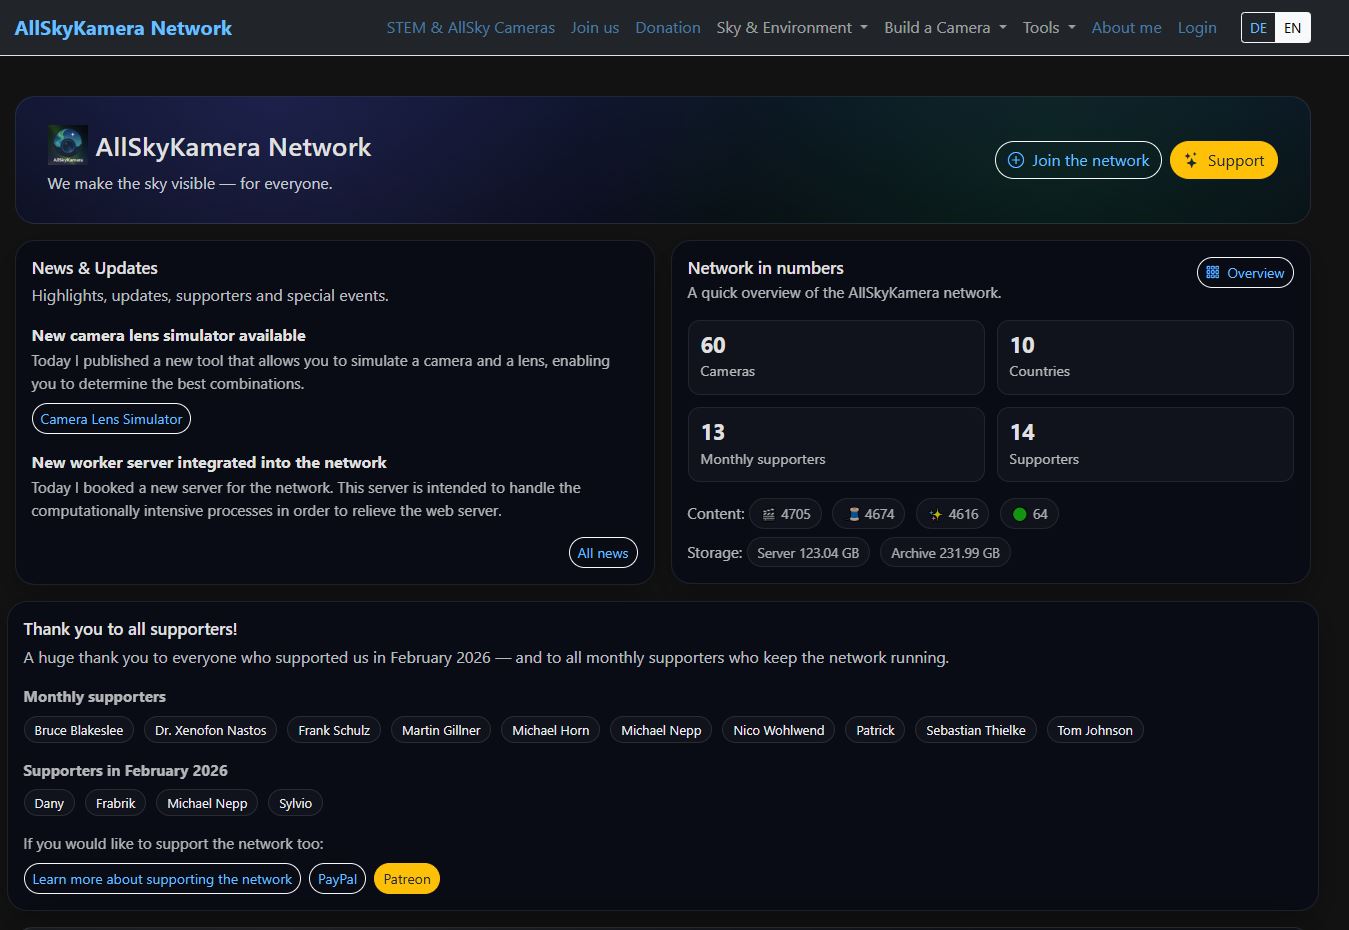
Many contents on AllSkyCamera are freely accessible without login. You can immediately view live sky images, browse archives and learn about the network.
What can I access without login?
- Homepage with an overview of all cameras. The homepage is structured by categories and shows the status of the cameras.
- Menu with links to important areas of the website.
- Interactive map on the homepage as well as a dedicated page at mapdata.php.
- Each camera has its own camera page with live image, archive and additional data products.
- Each camera has its own sensor page with live values and measurement series – depending on the installed hardware.
- Cameras can additionally have a public profile page if it has been activated by the camera owner.
- Camera building pages with information and help for building your own AllSkyCamera.
- Network information and supporter pages related to the project.
- Newsletter with information about new cameras, developments and special events.
- Tools such as configuration tools for TJ and INDI interfaces or the camera lens simulator.
The most important public subpages and views are described individually in the following chapters.
2.1 Cameras & camera pages
Cameras are the central component of the network. On the homepage only currently online cameras are displayed. From there you can directly access their detail pages.
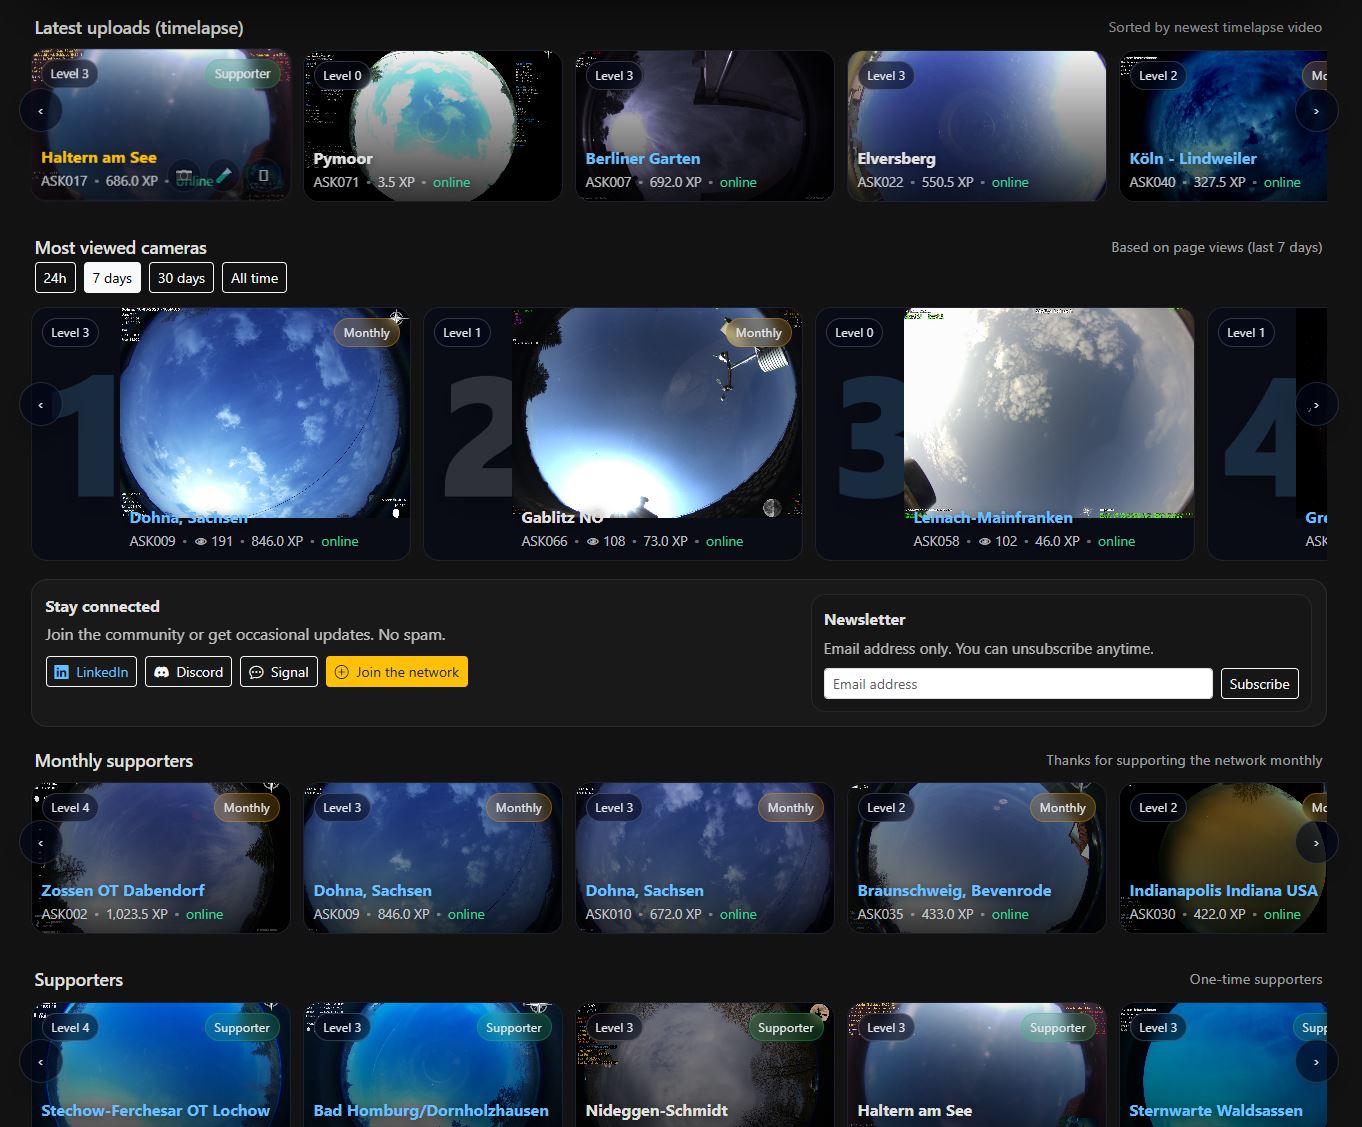
A) Camera tile on the homepage
The camera tile shows the most important information about a currently online camera in a compact form.
- Current preview image of the camera.
- Location name, camera name and ASK number.
- Indicator that the camera is currently online.
- Direct links to the camera page, sensor page and – if available – the profile page.
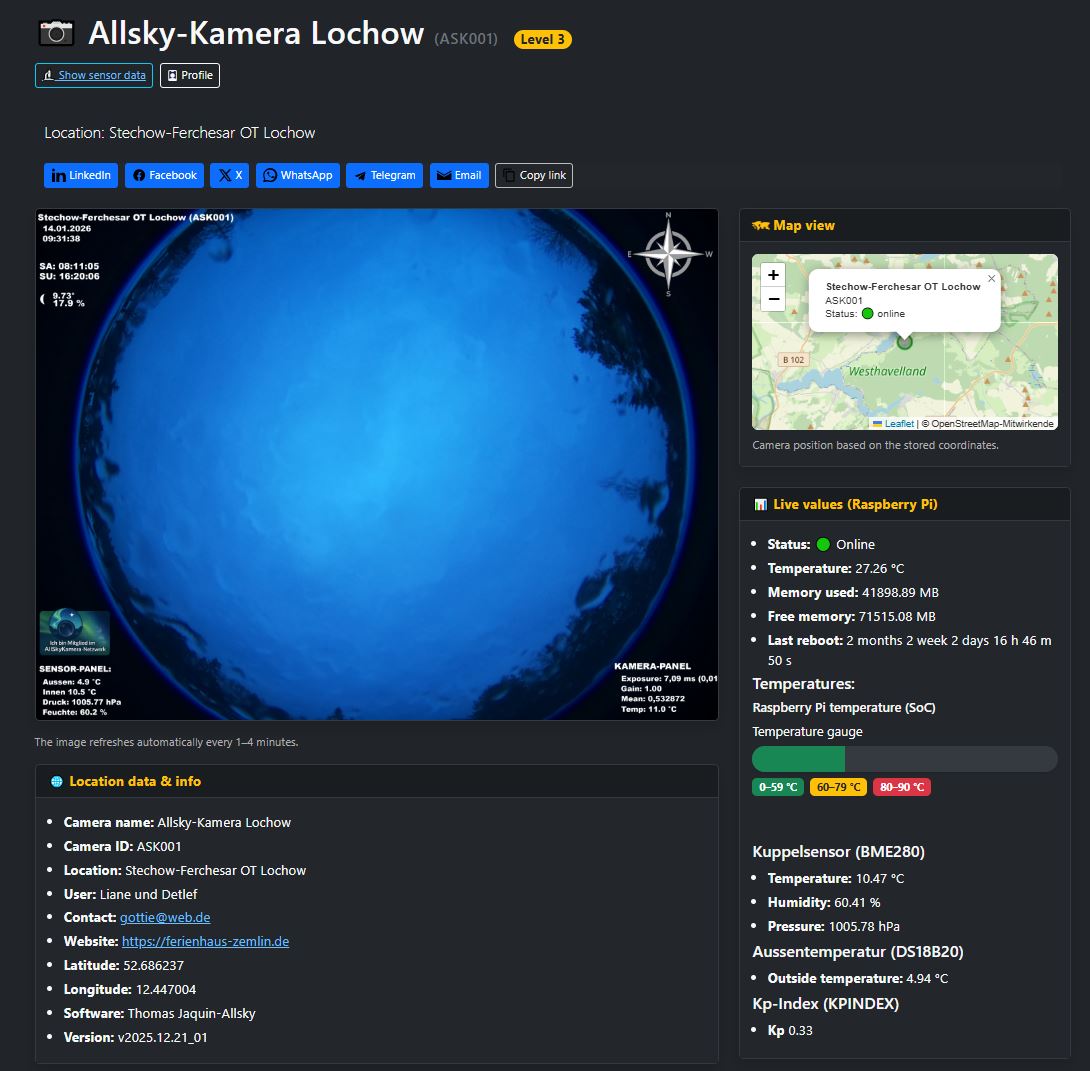
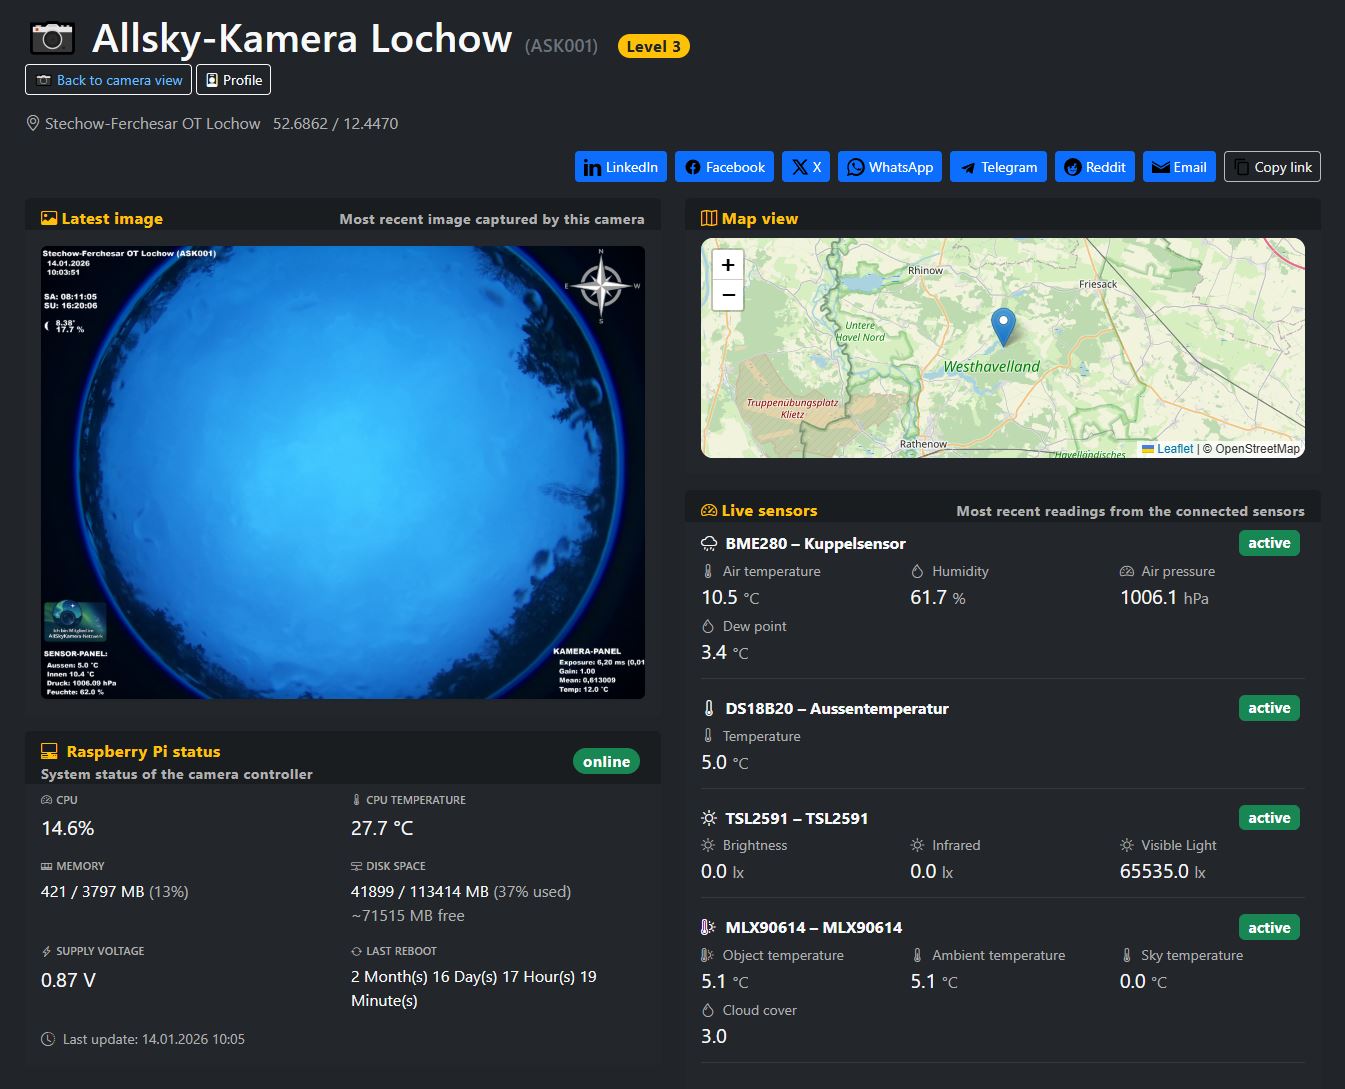
B) Camera detail page
The detail page bundles all important information about a camera. This includes the header section, live image, live values, supporter status and additional views related to the current image.
- Name of the camera and location name.
- ASK number of the camera.
- Level of the camera based on XP points.
- Internal like button, e.g. related to "Camera of the Month".
- Supporter status such as Supporter or Monthly Supporter.
- Current live image of the camera.
- Live values such as local times, camera uptime and other current status information.
- Additional notes about the camera and its current condition.
- Histogram below the live image for direct evaluation of brightness and distribution.

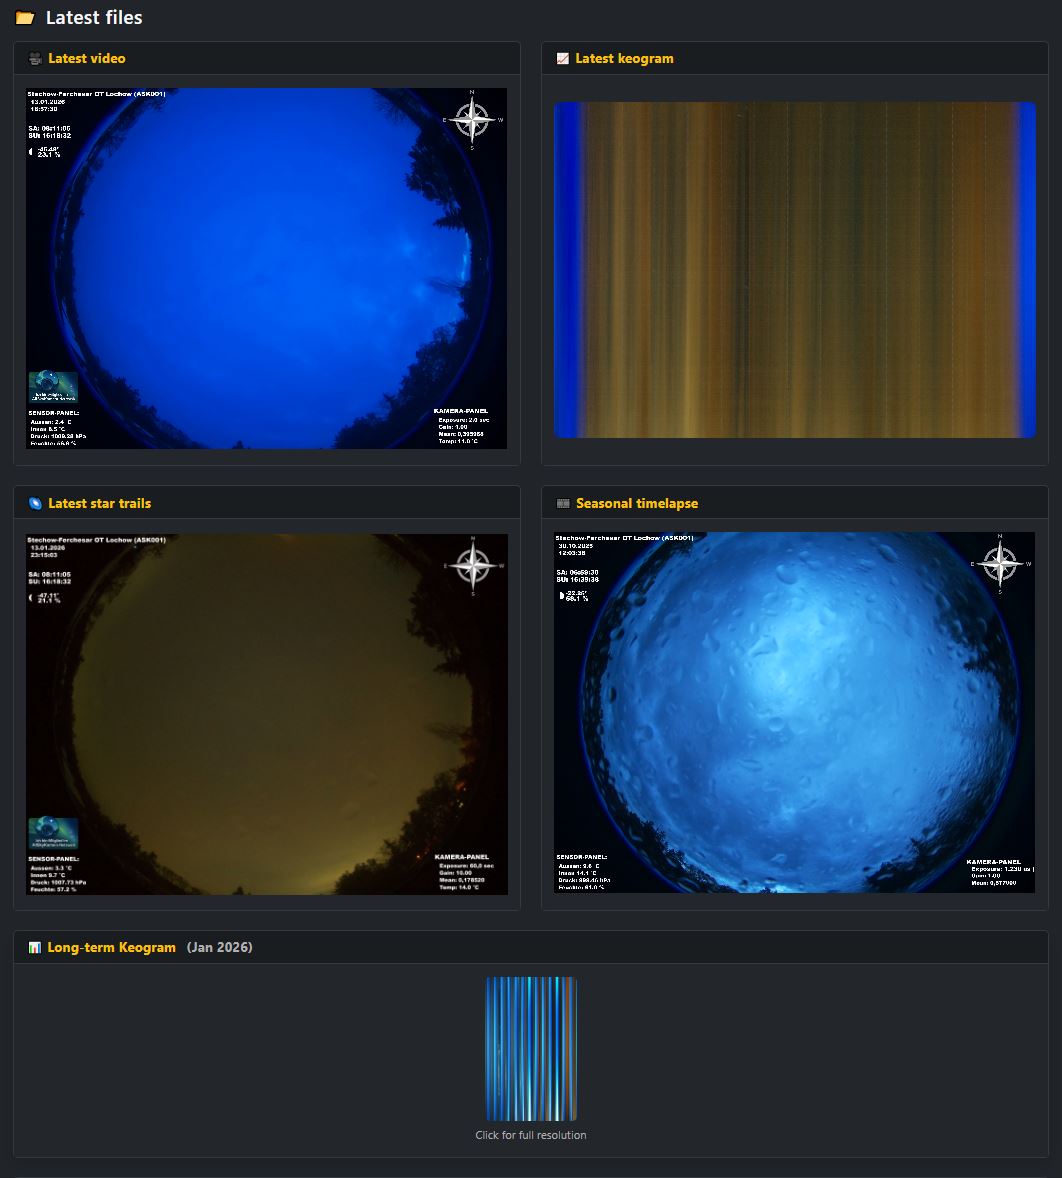
C) Latest files & data products
Many cameras automatically generate additional products that can be accessed on the detail page or via subpages.
- Latest video (timelapse).
- Latest keogram.
- Latest startrails.
- Long-term products such as seasonal video or long-term keogram.
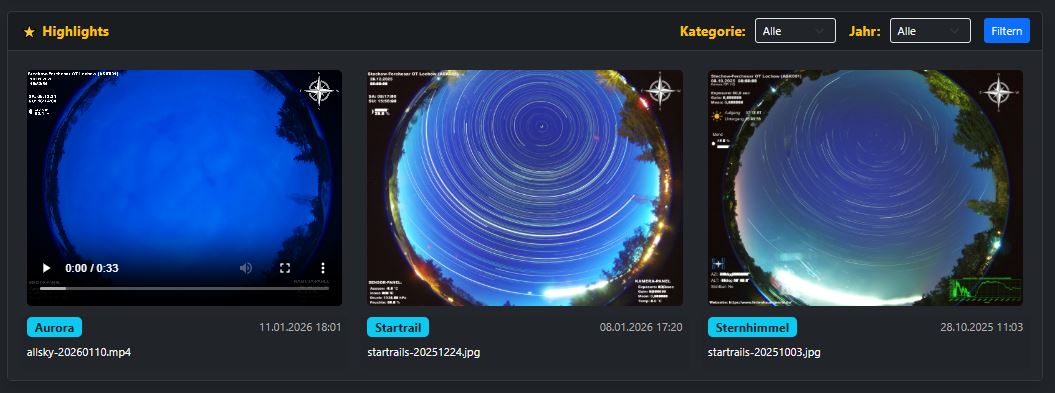
D) Highlights
Highlights are a curated collection of special events, such as aurora, starry skies or notable startrails, and make the network exciting for visitors as well.
2.2 Sensor page
On the sensor page you will find live values and measurement series from the camera. Which values are visible depends on the installed hardware, such as temperature, humidity or SQM sky brightness.
- Temperatures (Pi, housing, outdoor – depending on sensor).
- Humidity and air pressure (e.g. BME280).
- System data such as uptime or storage (depending on the camera).
- Sky brightness (SQM / TSL2591 – if available).
- Additional values such as Kp index or weather data (if integrated).
- Grafana links or detail pages (if enabled).
Sensor pages can look different for each camera because camera owners can structure this page dynamically themselves. Additionally, sensor values written to the database through our API may also appear here and may not necessarily be related to the camera hardware itself.
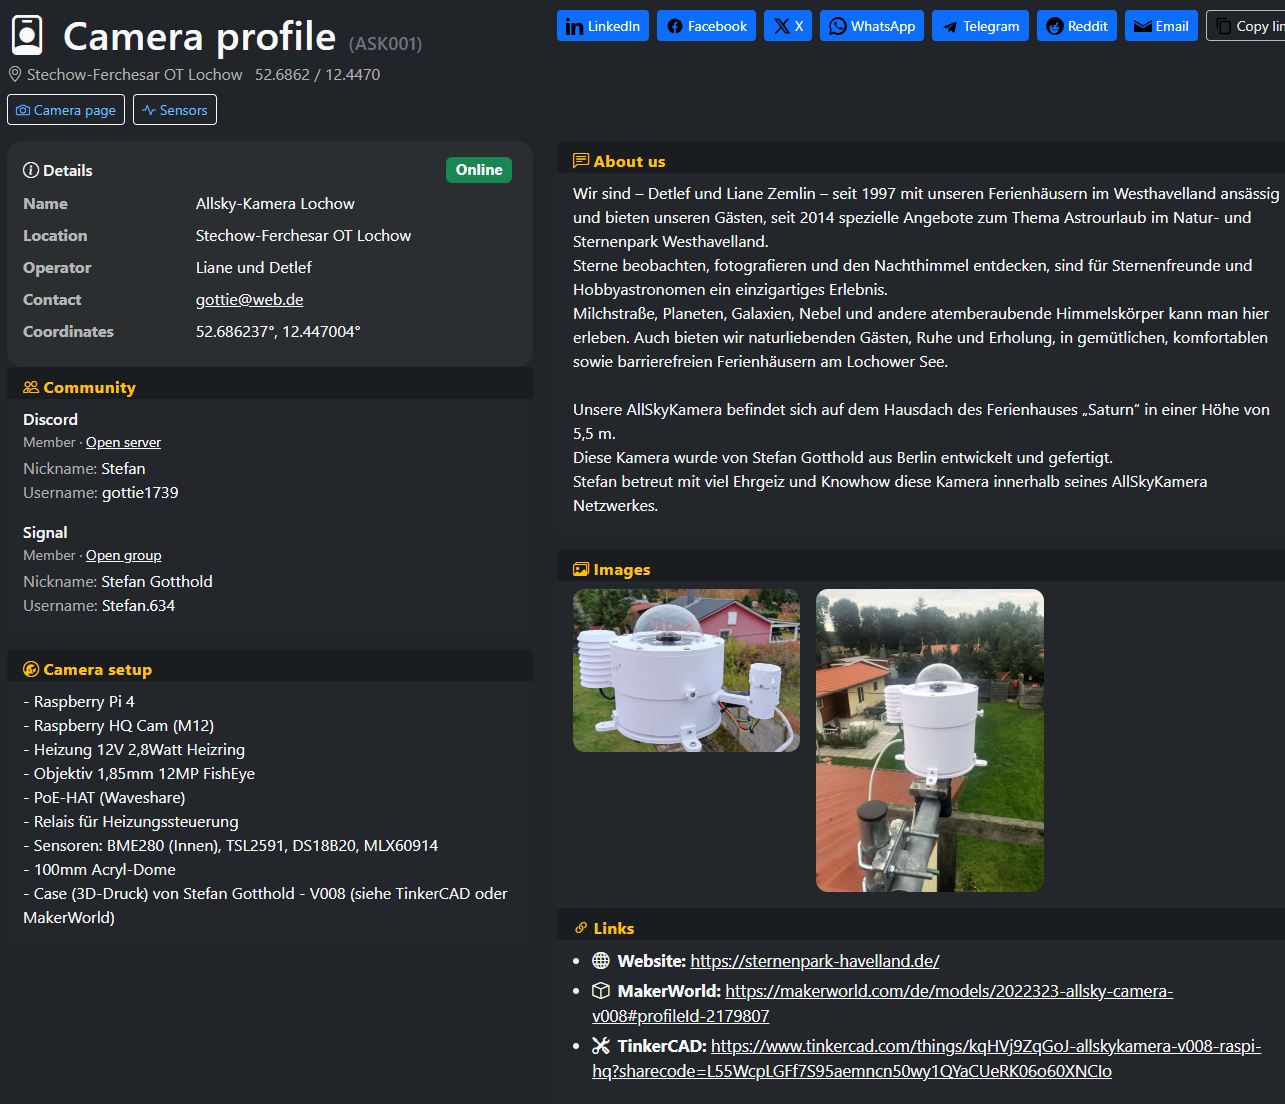
2.3 Profile page
The profile page is a public profile page for the camera. It shows information about the location, setup, community and optionally images and links. It only exists if the camera owner activates the profile in the user profile and adds content.
- Camera details (name, location, contact, coordinates).
- Text section “About us” or description of the location.
- Camera setup (hardware, sensors, dome, housing etc.).
- Discord/Signal information (optional if maintained).
- Image gallery (optional).
- Links (website, MakerWorld, TinkerCAD etc.).
If no profile is active, the "Profile" button will not appear. The page is intentionally optional so camera owners can decide which information should be publicly visible.
If you operate a camera, logging in is worthwhile. It allows you to manage your profile, the camera profile page and community features.
3. Special pages
Here we document special overview and detail pages that offer additional content and filters – regardless of whether you are logged in or not.
On the camera pages there is a block called “Detail Pages”. From there you can directly access special lists and overviews.
- Opens the sensor page of the camera.
- Show all videos: list of timelapse videos.
- Show all keograms: keogram archive.
- Show all startrails: startrail archive.
- Open Grafana panel: advanced dashboards and charts, if available.
- Archive: Contains all data such as timelapse, keogram, startrails, etc.

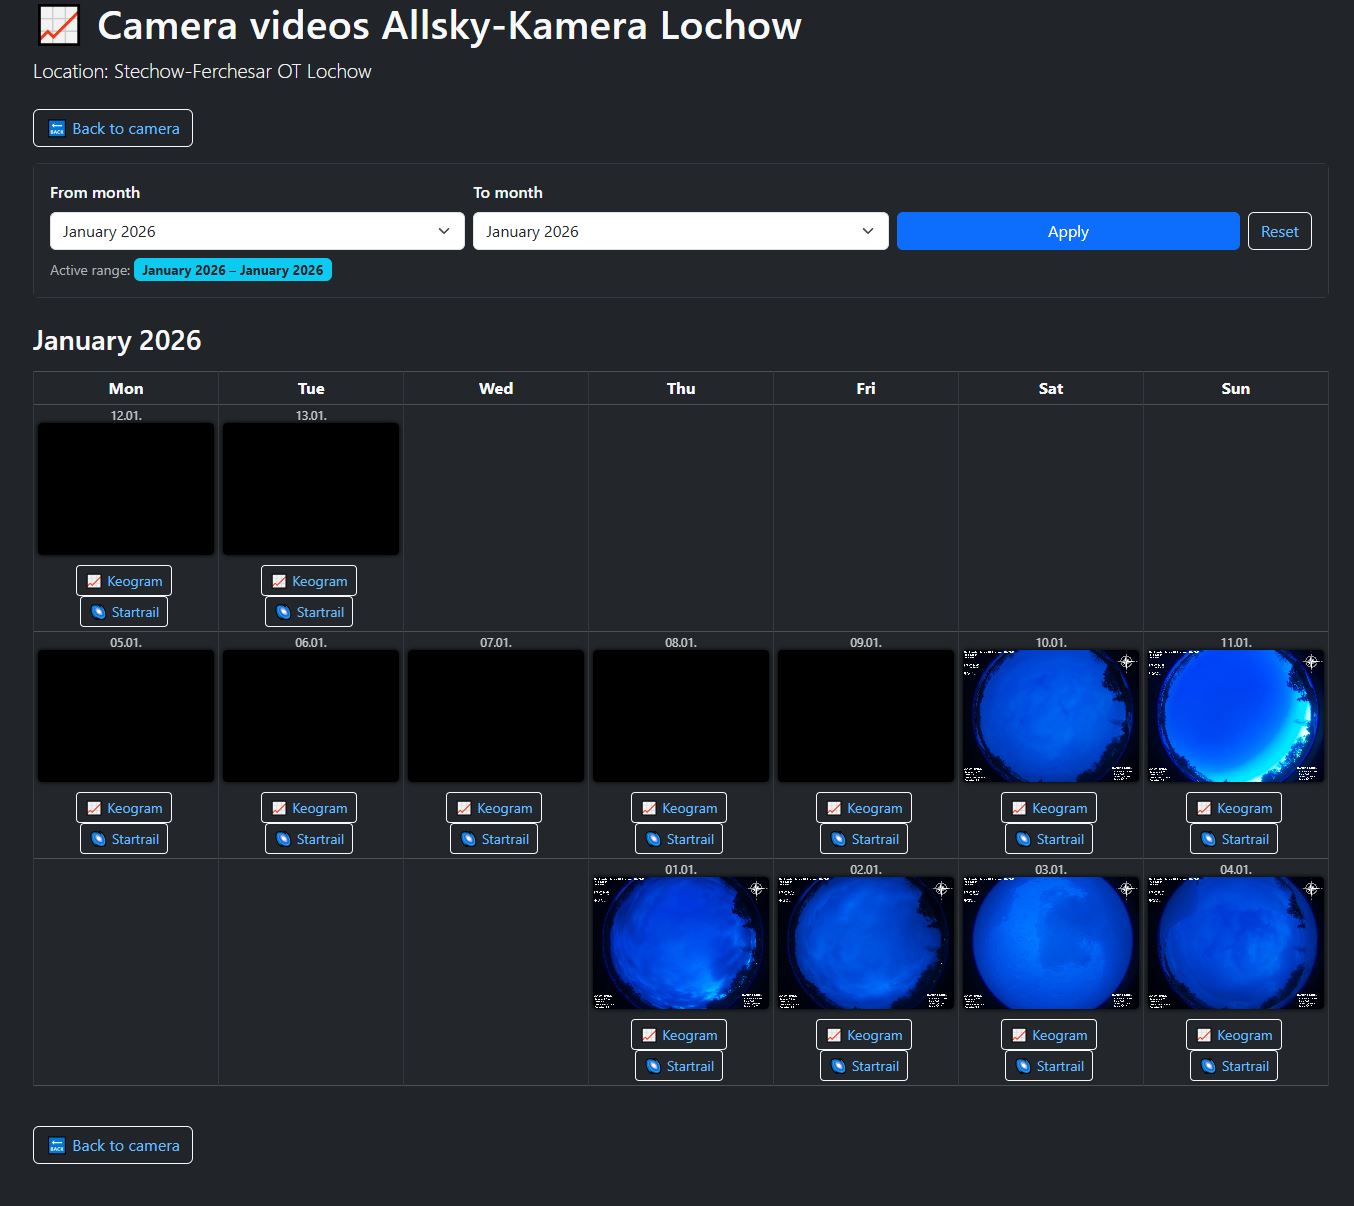
Show all videos
This page shows all timelapse videos of a camera in a calendar view. You can limit the time period and quickly jump to individual days.
Time period filter
- Select “From month” and “To month”.
- Click “Apply” to load the selected time period.
- “Reset” resets the filter.
Calendar view
- Each day is a tile – as soon as a video is available, a preview appears.
- Below the day tiles there are direct buttons, e.g. keogram or startrail, if these products exist for that day.
- With “Back to camera” you can return to the camera detail page at any time.
If no preview is visible on a day, then either no video exists for that day or it has not yet been generated or uploaded.
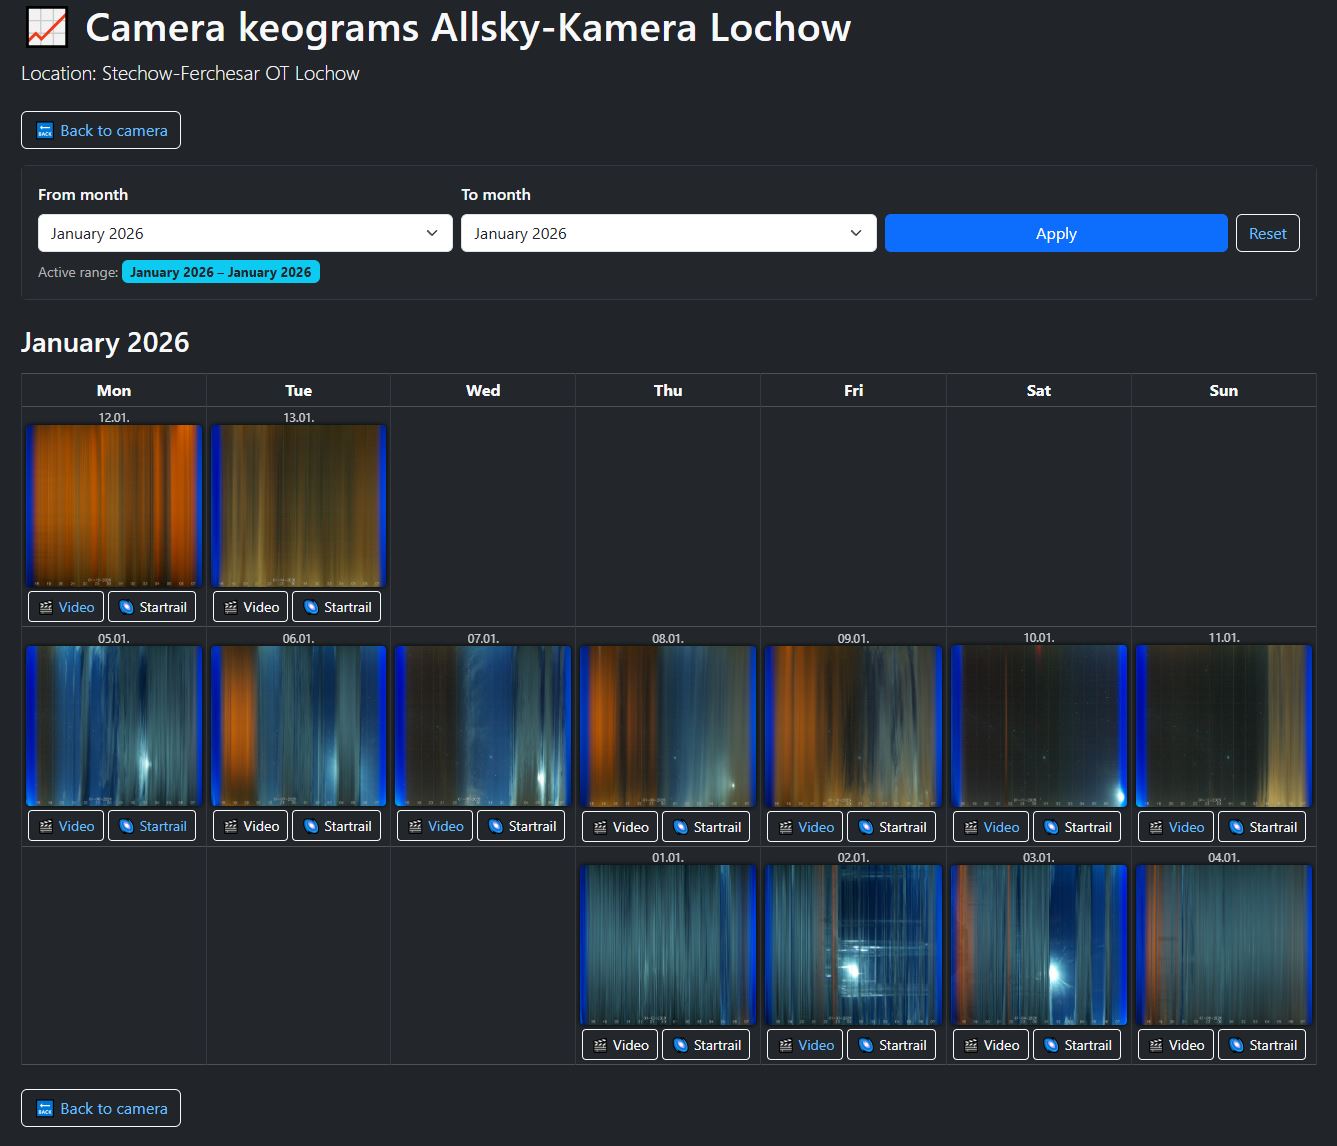
Show all keograms
This page shows the keograms of a camera in a calendar view. A keogram is a compact representation of the sky over time and is especially useful for quickly recognizing clouds, brightening or events.
Time period filter
- Select “From month” and “To month”.
- Click “Apply” to load the selected time period.
- “Reset” resets the filter.
Calendar view
- Each day is a tile – if a keogram exists, a preview is displayed.
- Using the buttons for each day, you can jump directly to the video or startrail view, if available.
- With “Back to camera” you return to the camera detail page.
Keograms are especially helpful for comparing night quality. Clear nights often show uniform structures, while clouds or haze produce distinct patterns.
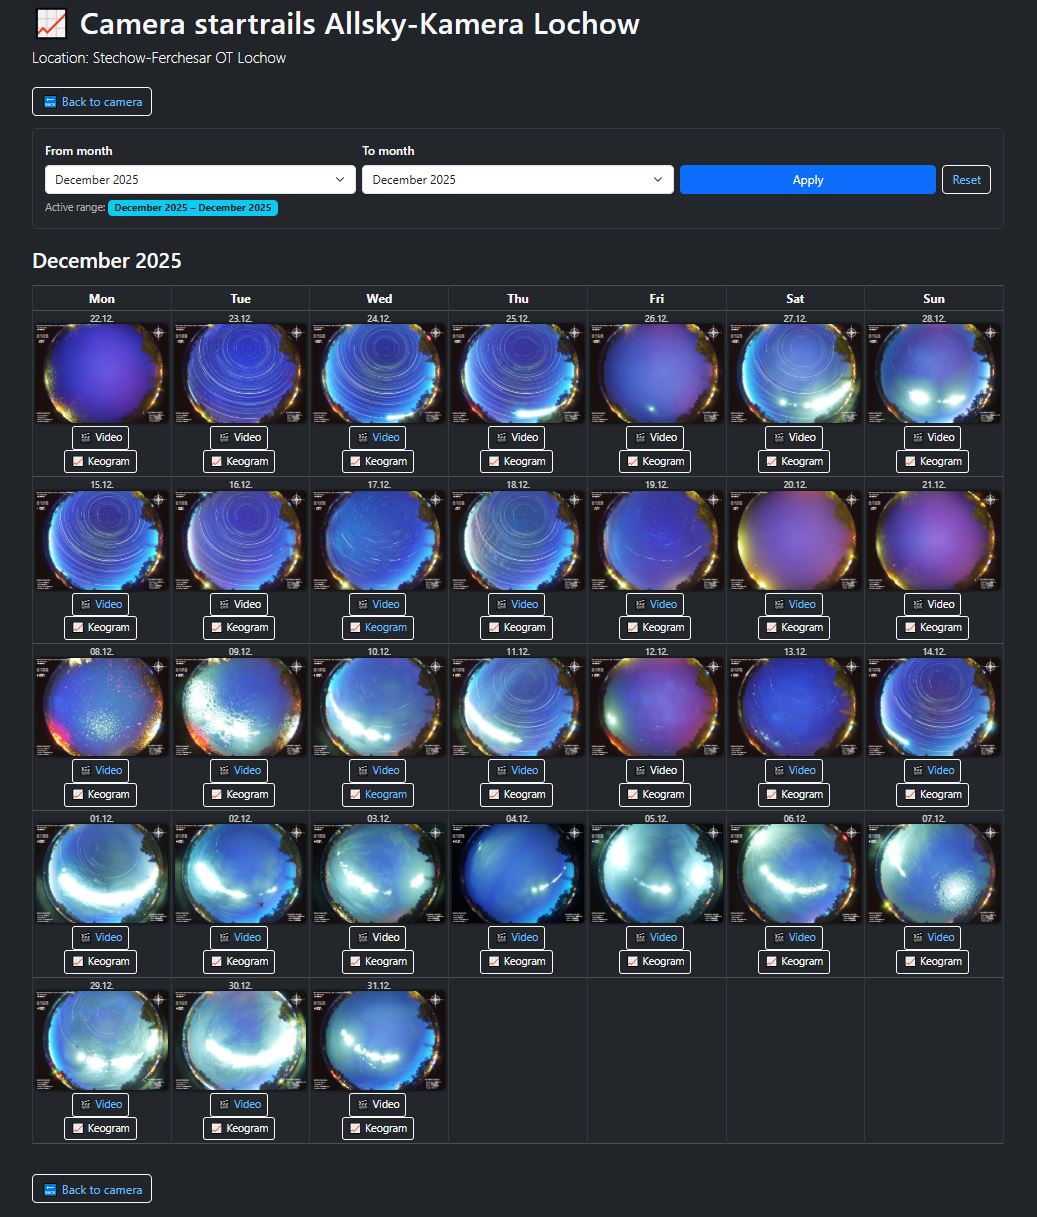
Show all startrails
This page shows the startrails of a camera in a calendar view. Startrails are star trail images created by combining many individual exposures of one night, making the apparent motion of the stars visible.
Time period filter
- Select “From month” and “To month”.
- Click “Apply” to load the selected time period.
- “Reset” resets the filter.
Calendar view
- Each day is a tile – if a startrail exists, a preview is displayed.
- Using the buttons for each day, you can jump directly to the video or keogram view, if available.
- With “Back to camera” you return to the camera detail page.
Startrails work especially well on clear nights. Clouds, dew or strong light pollution can significantly affect the result.
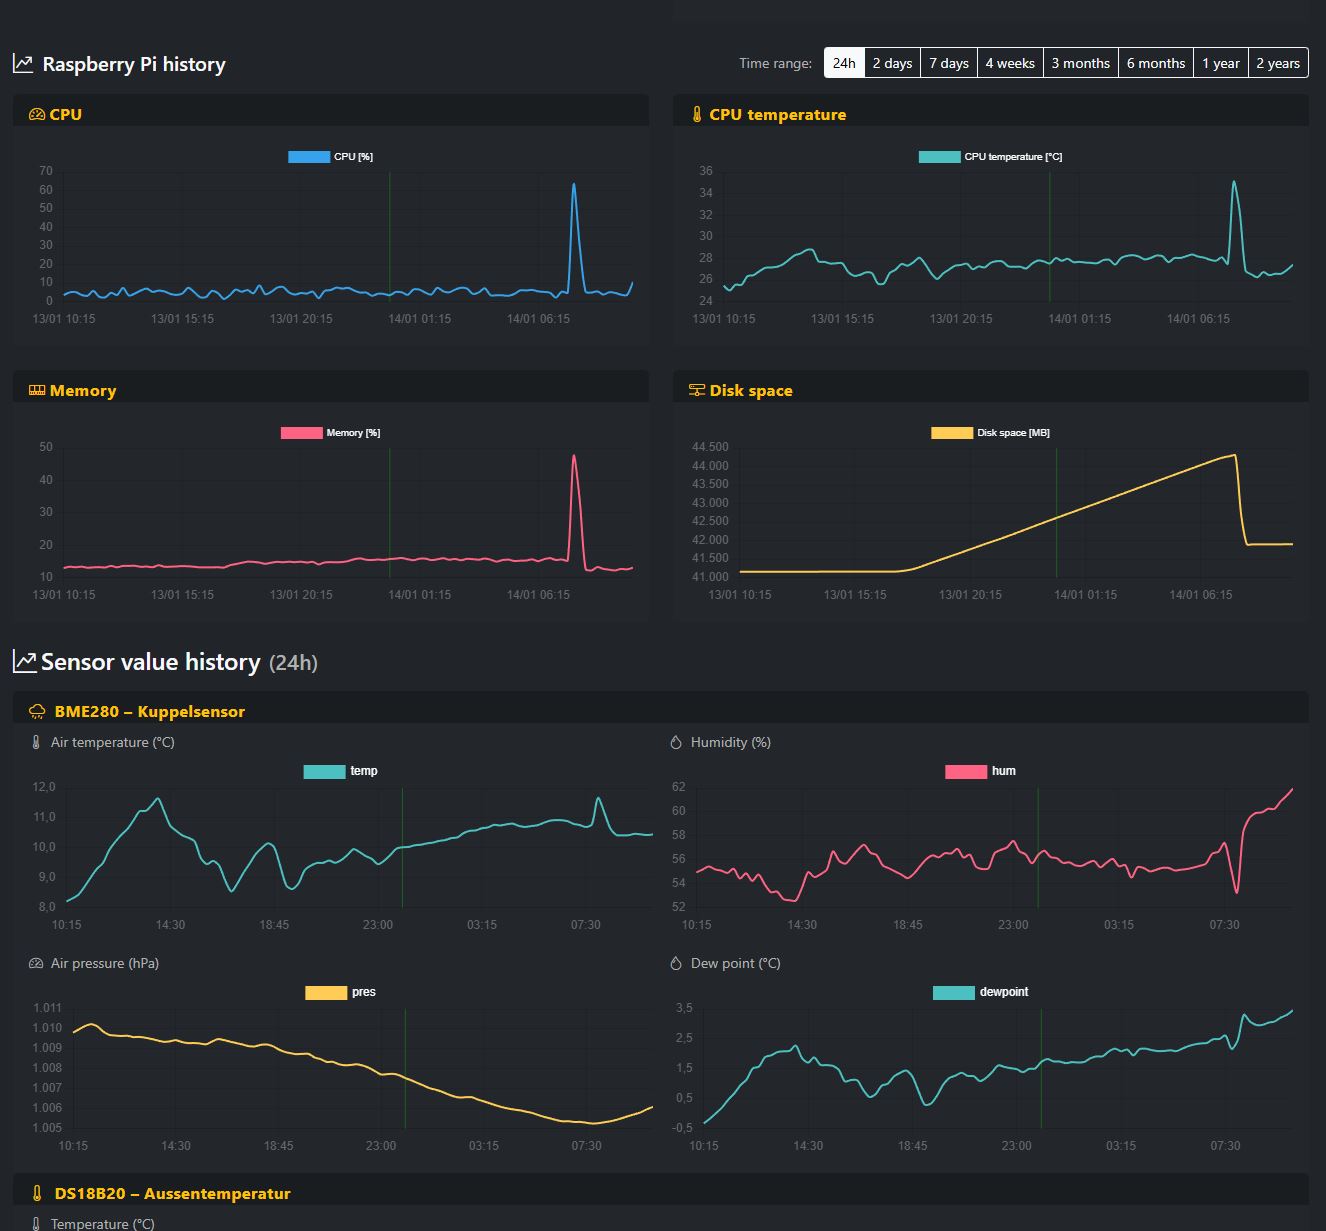
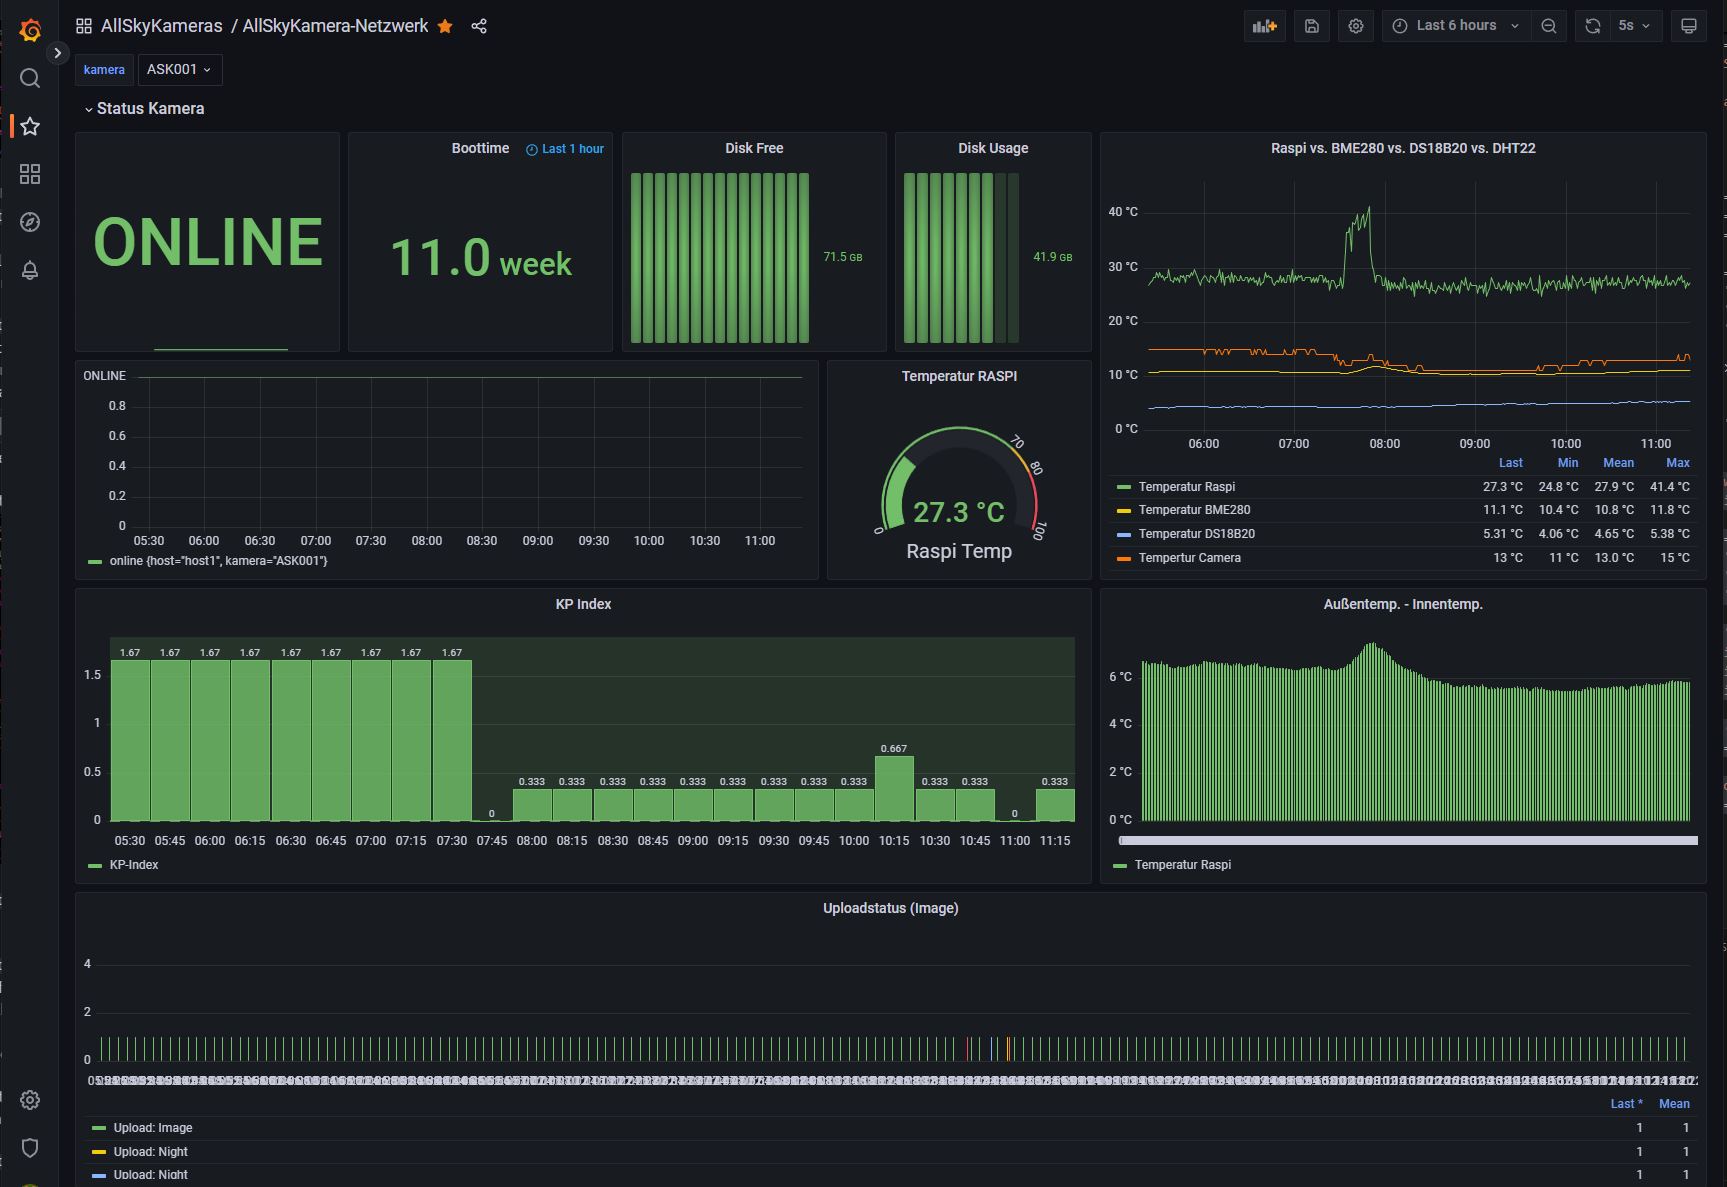
Open Grafana panel
Grafana provides advanced dashboards and charts for status and sensor data. The link leads to an external Grafana server and not directly to allskykamera.space.
What can I see there?
- Status of the camera (online/offline) and runtime/uptime.
- System values such as storage usage and free capacity.
- Temperature curves, e.g. Raspberry Pi, BME280, DS18B20 or camera – depending on the sensors.
- Additional panels such as Kp index or upload status – depending on the dashboard.
Grafana is located on a separate server or host. Depending on the configuration, access may be public or require login. When opening it, you leave the allskykamera.space website.
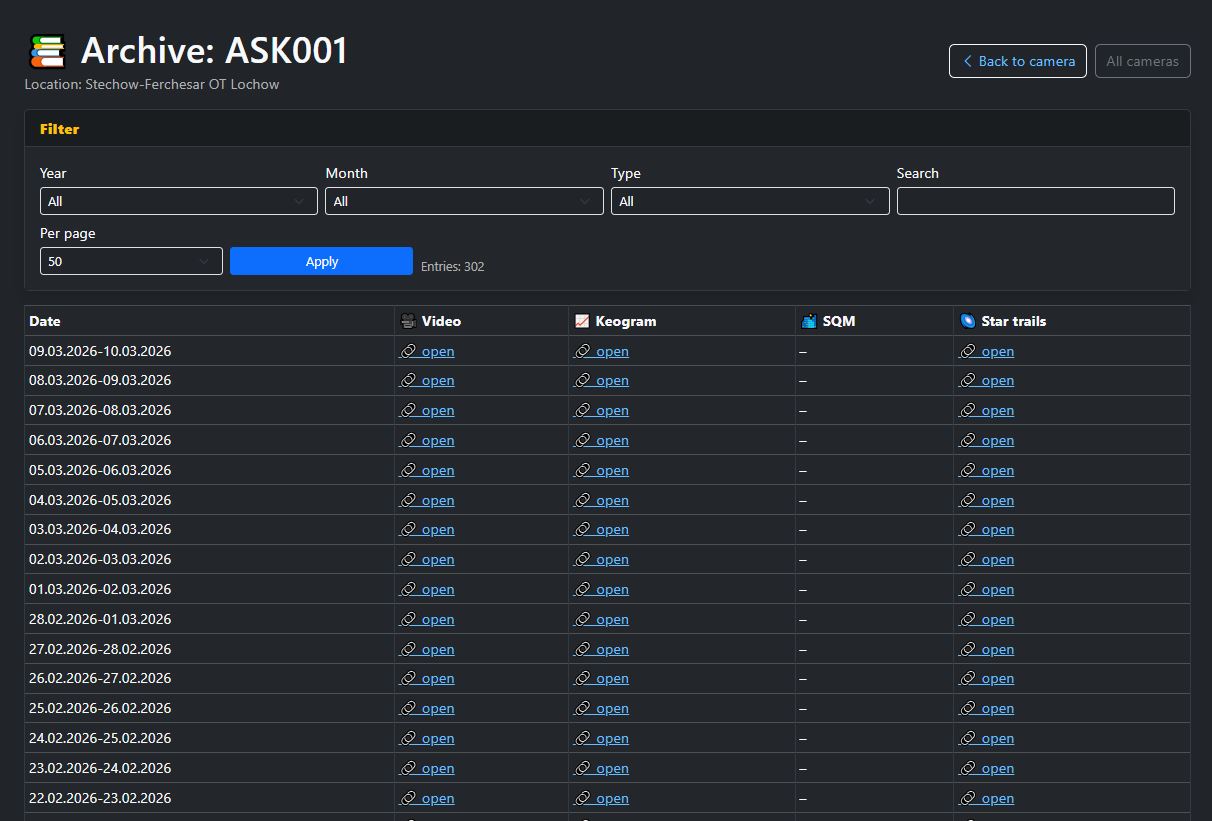
Archive
The archive bundles older recordings and data of a camera in a clear view. This allows earlier days to be searched specifically and developments over longer periods of time to be traced.
What can I find there?
- Archived images and content by date.
- Quick access to earlier recordings of a camera.
- A structured overview of past days and available files.
- Direct navigation to older content without having to leave the current camera page.
Which contents are visible in the archive depends on which files are stored and publicly available for the respective camera.
4. Tools
The tools section provides additional utilities that help with the analysis, comparison and technical configuration of AllSkyCameras. The individual subpages are described below.
Data
In the "Data" section, camera-related content and information can be displayed centrally, checked or prepared for further processing.
Typical contents
- Overview of available camera-related data.
- Help with checking and evaluating files or data states.
- Basis for further analysis and technical comparisons.
Which data are actually visible depends on the current development stage of the website and the content available for the camera.

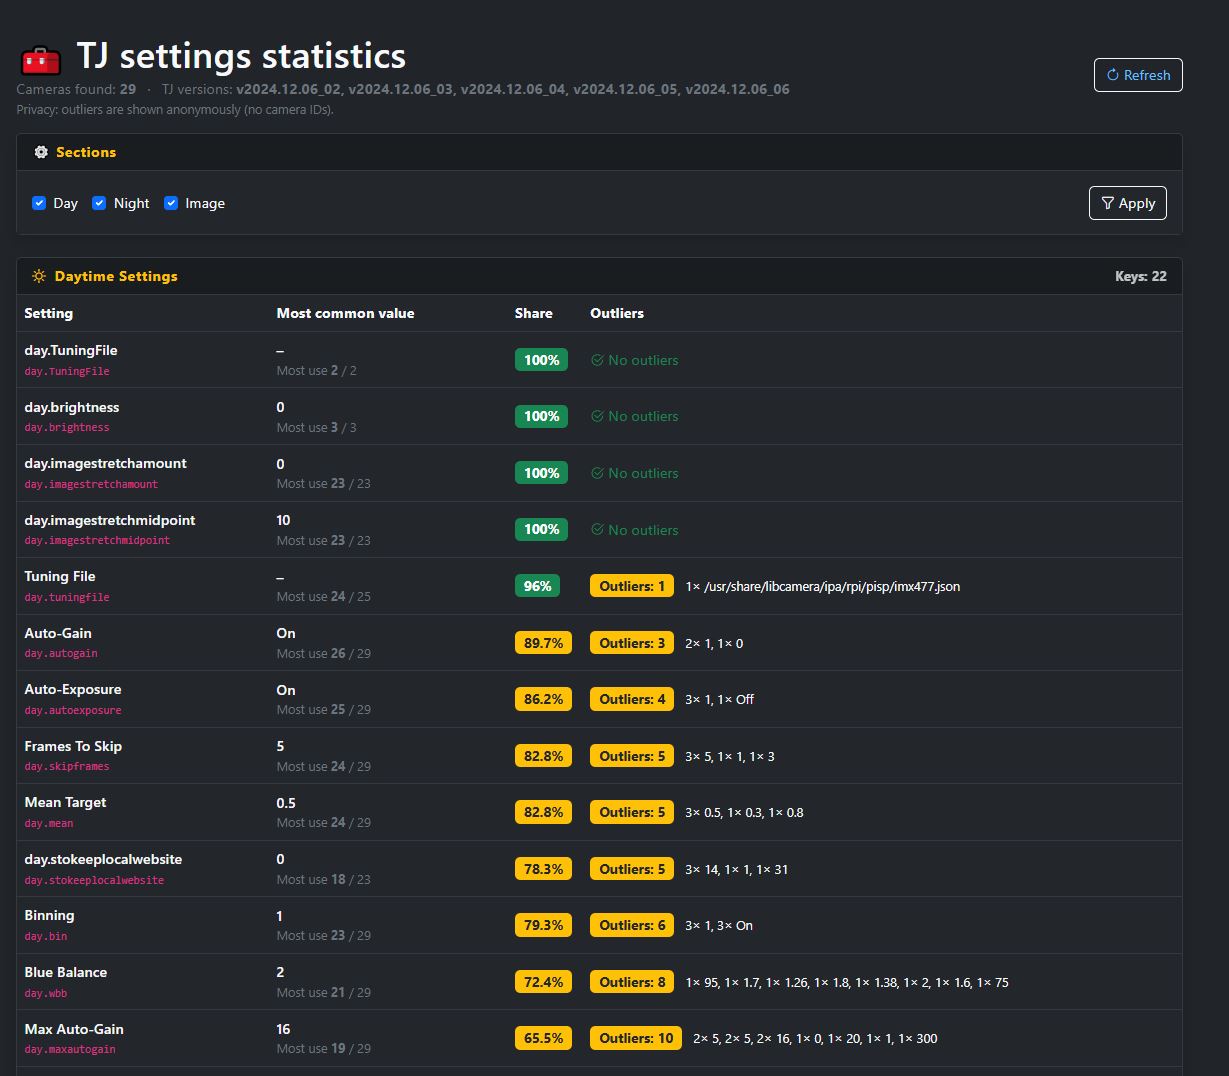
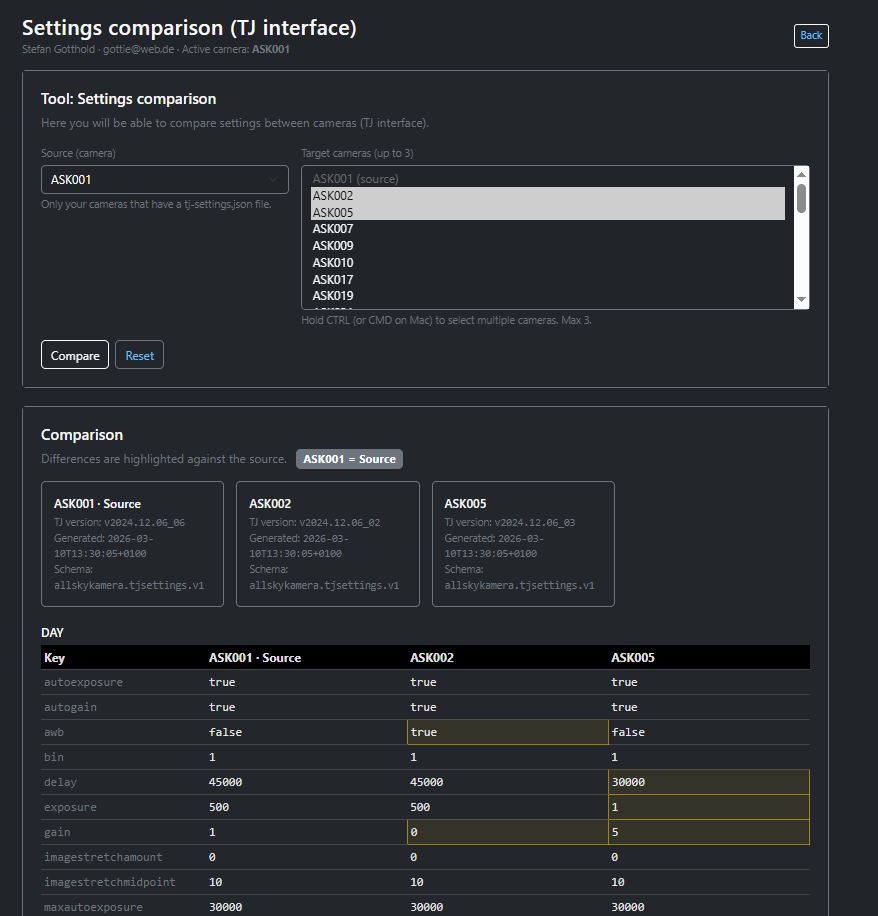
TJ settings comparison
This tool helps compare and evaluate settings of cameras using the TJ interface. This allows configurations to be checked and optimized more quickly.
What is possible?
- Comparison of different camera settings.
- Better assessment of the effects of individual parameters.
- Support in optimizing your own camera configuration.
This tool is intended as support for evaluation and comparison. Which settings make sense always depends on the camera setup and location.
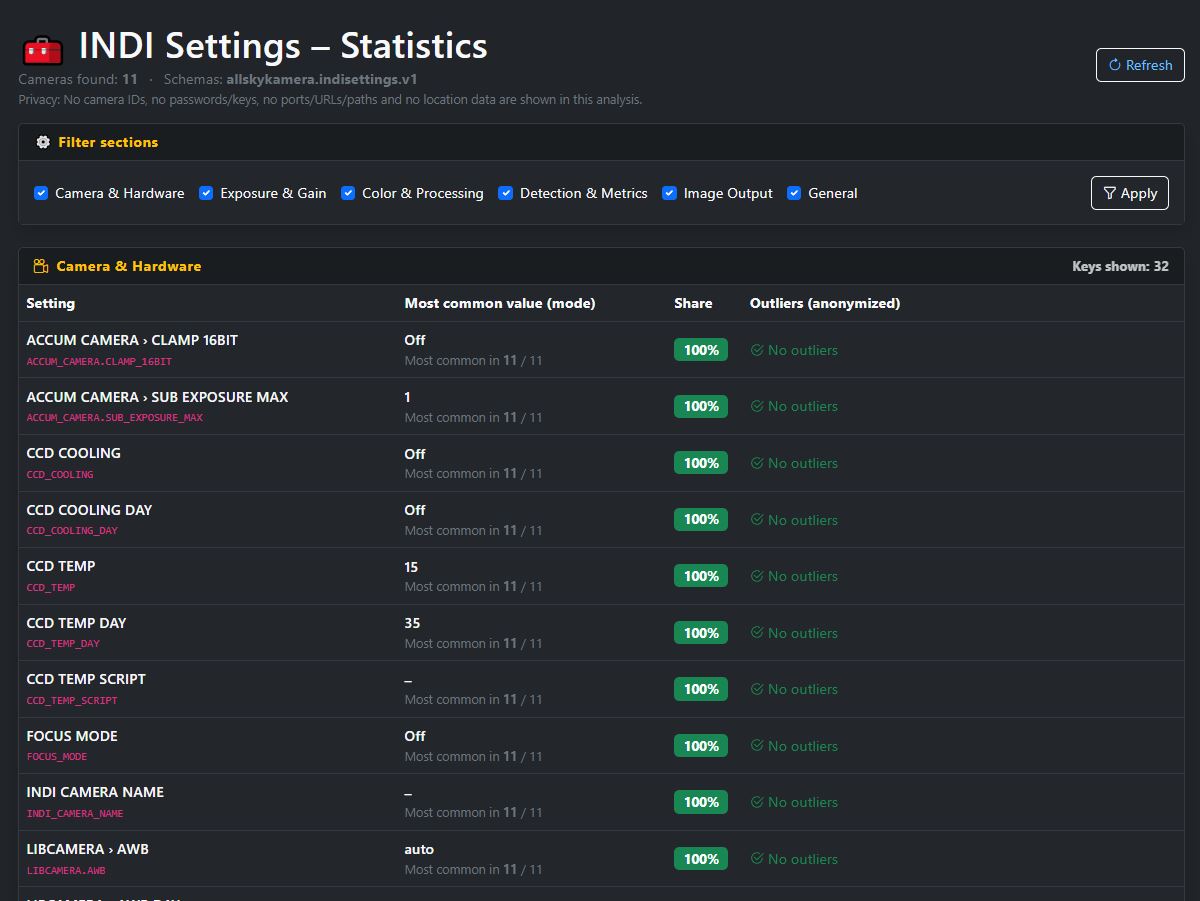
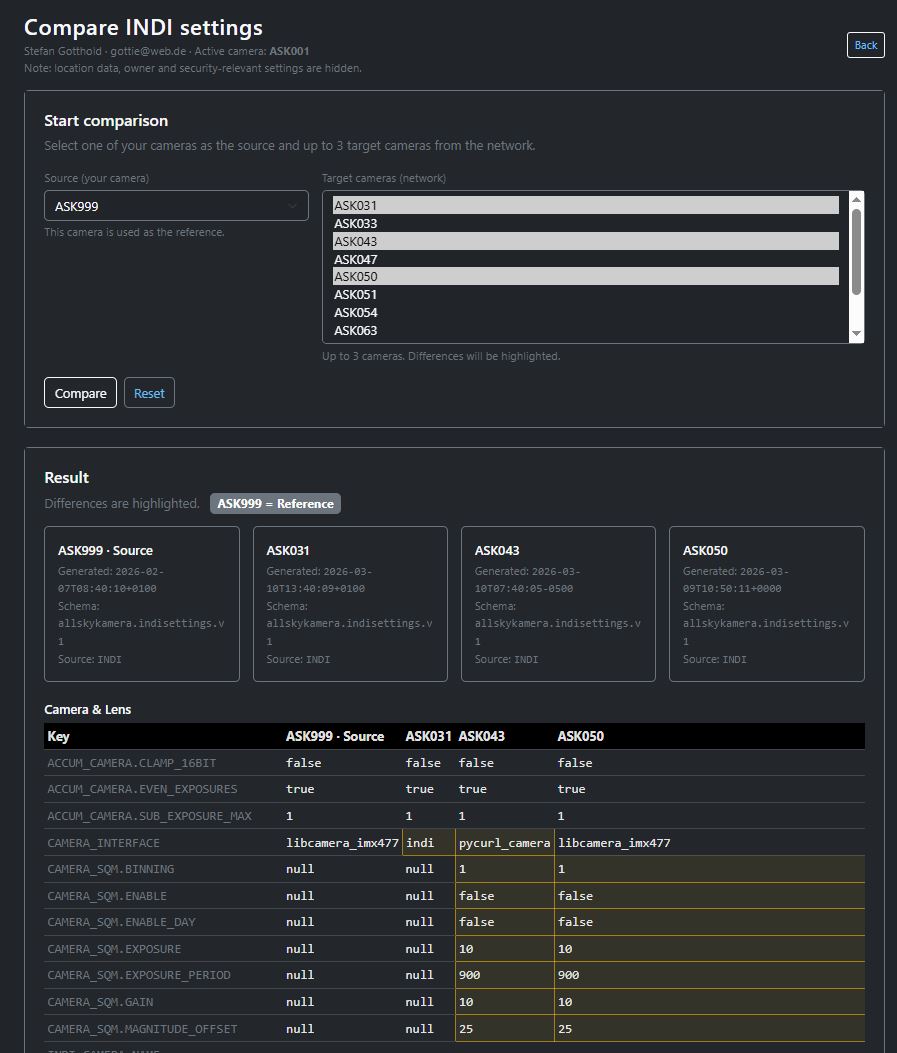
INDI Settings
This tool supports the comparison and evaluation of camera settings for INDI-based setups.
What is possible?
- Comparison of INDI-related camera settings.
- Technical support for configuring AllSkyCameras with INDI.
- Better understanding of parameters and their effects.
The same applies here: the optimal configuration always depends on the camera, lens, sensor and site conditions.
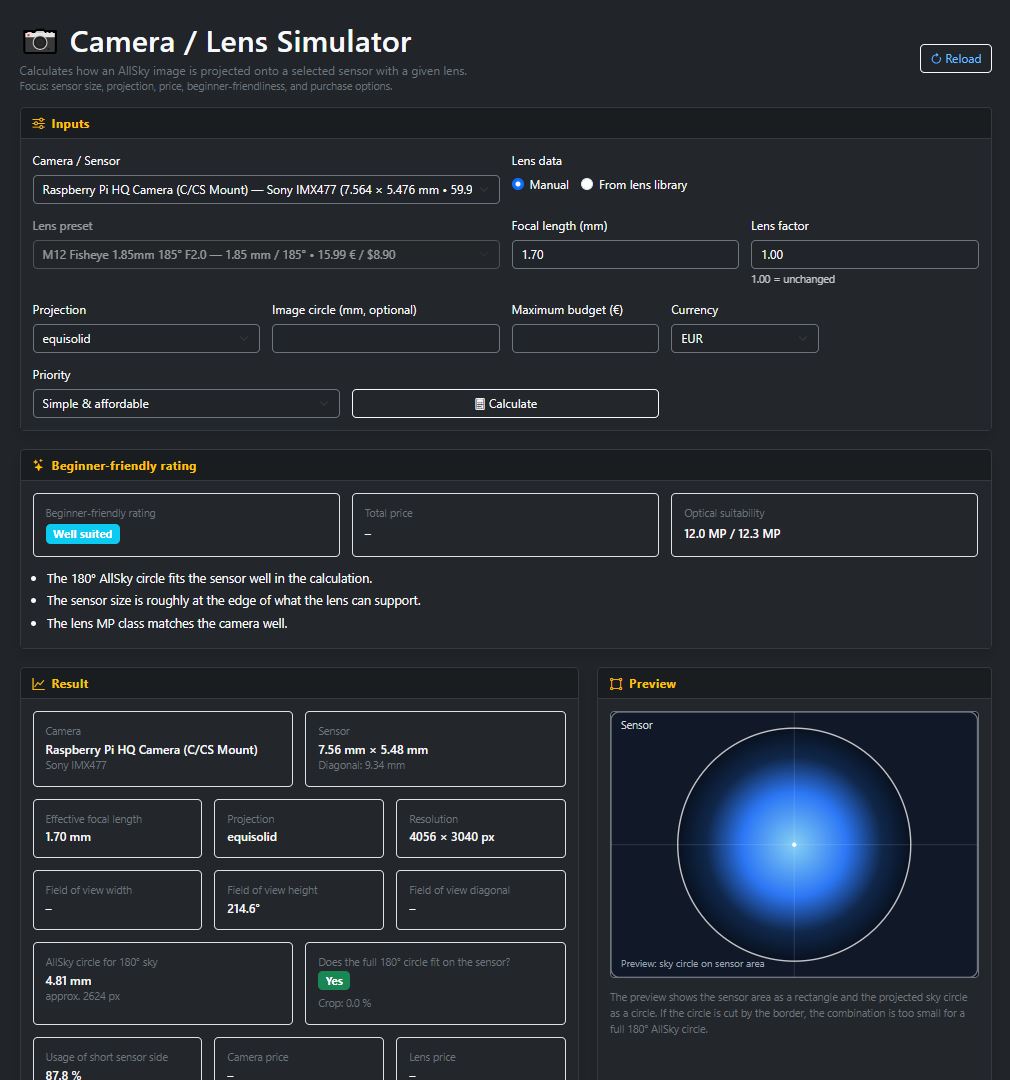
Camera Lens Simulator
The camera lens simulator helps assess camera and lens combinations more effectively. The tool supports comparison of field of view, sensor sizes and lens effects.
What is possible?
- Comparison of different camera and lens combinations.
- Estimation of field of view and image effect.
- Support in selecting a suitable setup for an AllSkyCamera.
The simulator helps with planning and comparison. Real results may vary slightly depending on housing, mounting and environment.
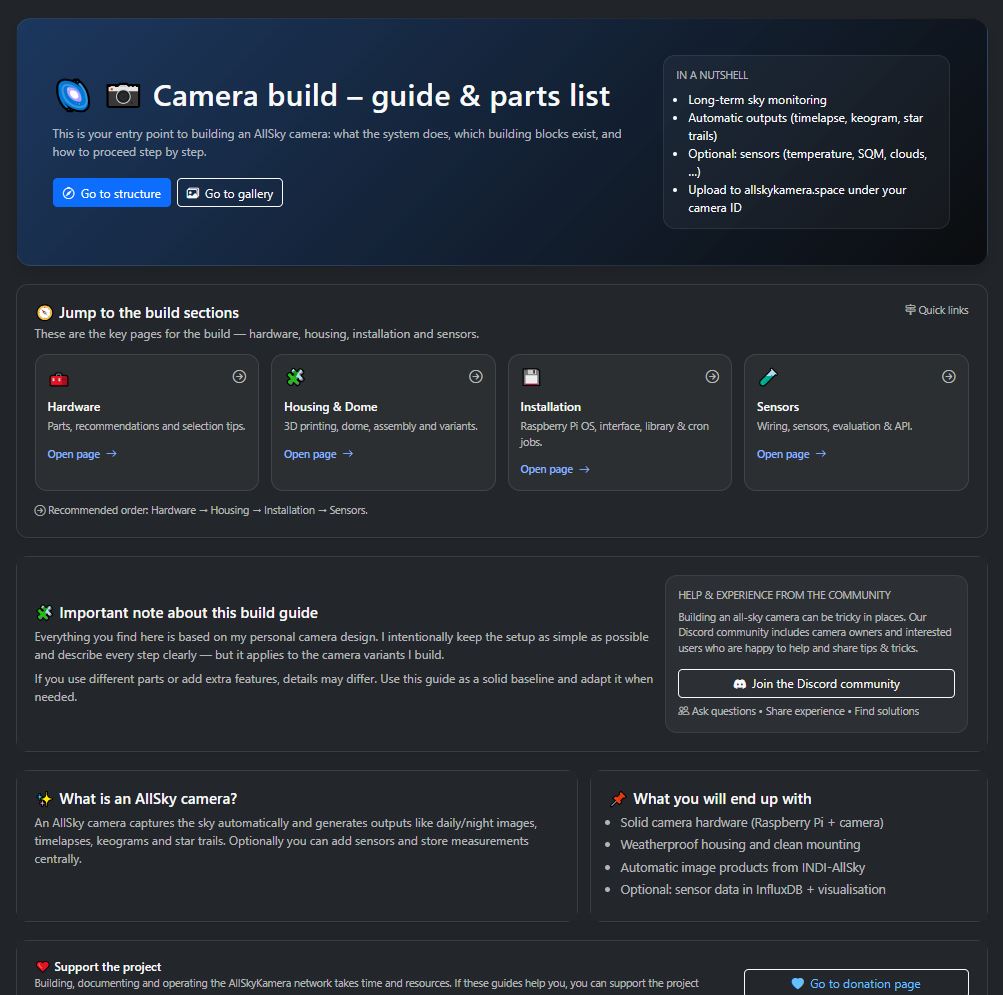
5. Camera building
In the camera building section, you will find information on building your own AllSkyCamera. This includes hardware, housing, installation and sensors. The most important subareas are described below.
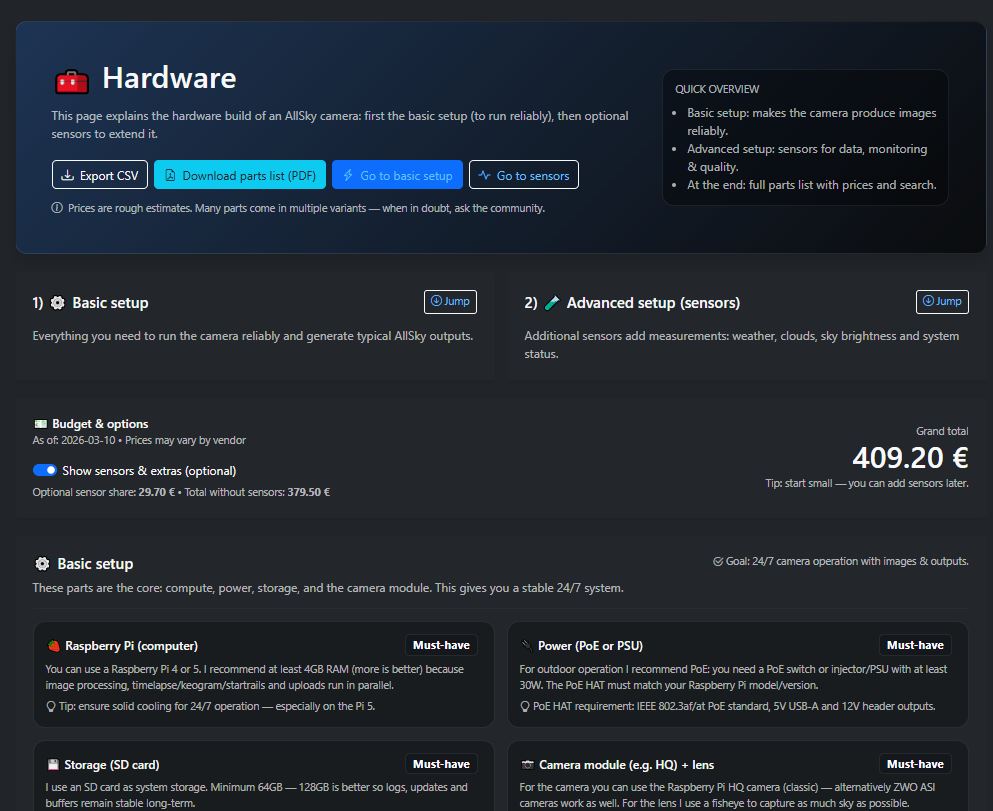
Hardware
The hardware section deals with the technical core components of an AllSkyCamera, such as Raspberry Pi, camera, lens, power supply and other key components.
Typical contents
- Overview of recommended or tested hardware components.
- Guidance for selecting suitable camera and Pi combinations.
- Basics for stable and long-term operation.
Which hardware is best suited depends on the location, the budget and the desired range of functions.
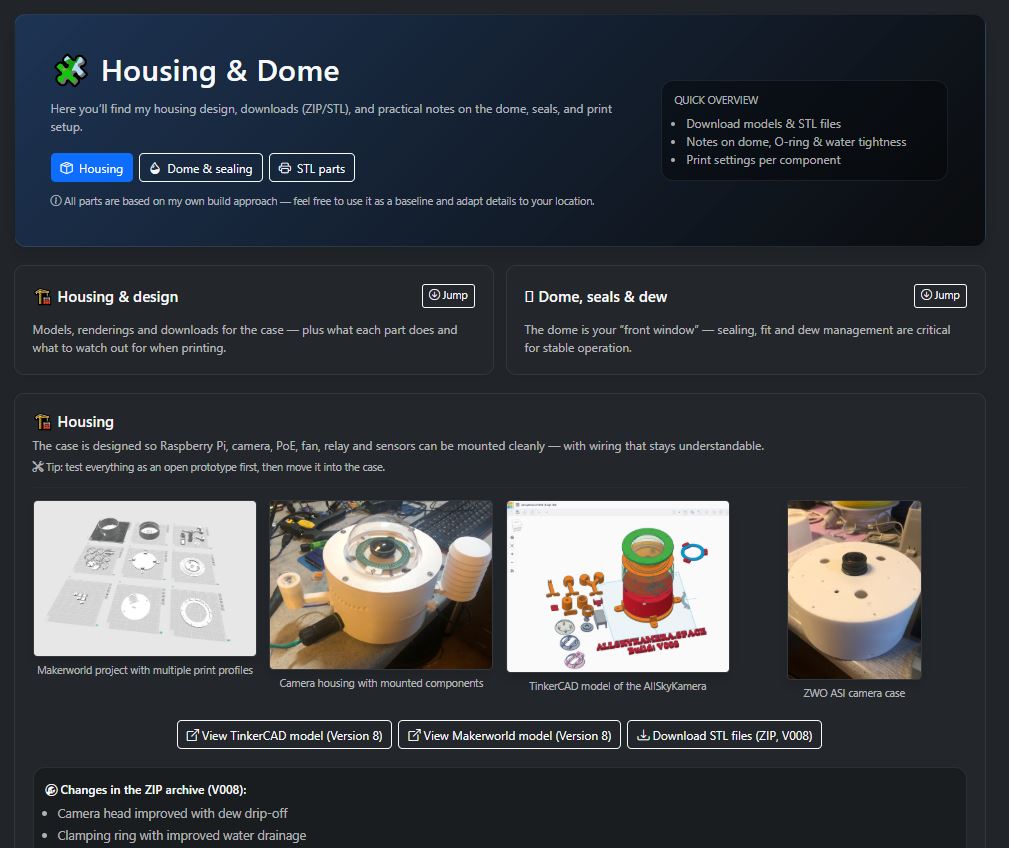
Housing
The housing section describes solutions for protecting the camera during outdoor use. This includes domes, mounts, weatherproof designs and mechanical concepts.
Typical contents
- Presentation of possible housing and dome solutions.
- Notes on weather resistance, ventilation and temperature management.
- Ideas for mounting, installation and practical implementation.
A good housing protects not only against rain, but also against dew, heat, cold and long-term material stress.
Installation
Installation includes setup, mounting and commissioning of the camera at the location. This includes power supply, network connection, alignment and initial tests.
Typical contents
- Guidance for mounting at the future observation site.
- Steps for power supply, network and initial commissioning.
- Tips for alignment and checking image quality.
Even small changes in location or alignment can significantly affect image quality and the visible section of the sky.
Sensors
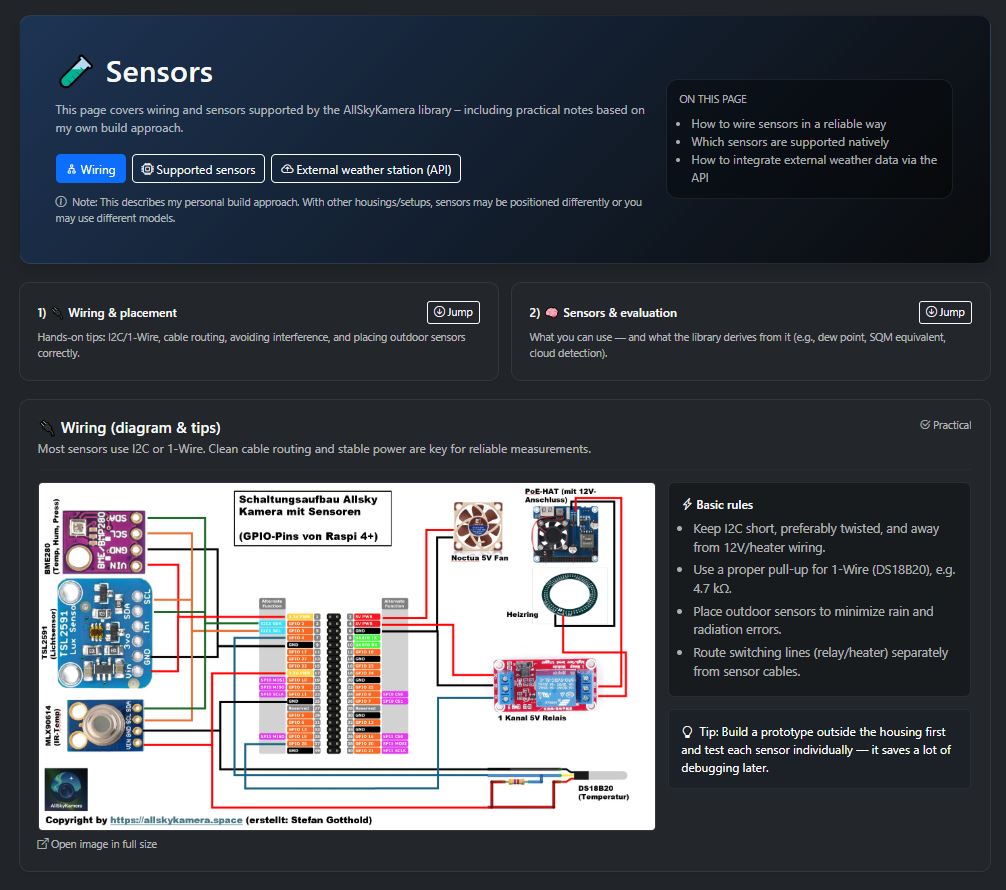
The sensors section is about additional measurement systems that can be operated together with the camera, such as temperature, humidity, sky brightness or other environmental values.
Typical contents
- Presentation of supported or typical sensors.
- Notes on integration into the camera system.
- Additional data for analysis, comparison and long-term observation.
Not every camera needs the same sensors. The setup depends on the goal of the project and the desired scope of measurements.
Join & apply for a secret key
To integrate your own AllSkyCamera into the network, you need a personal secret key. This key enables the secure assignment of your camera to the AllSkyCamera network.
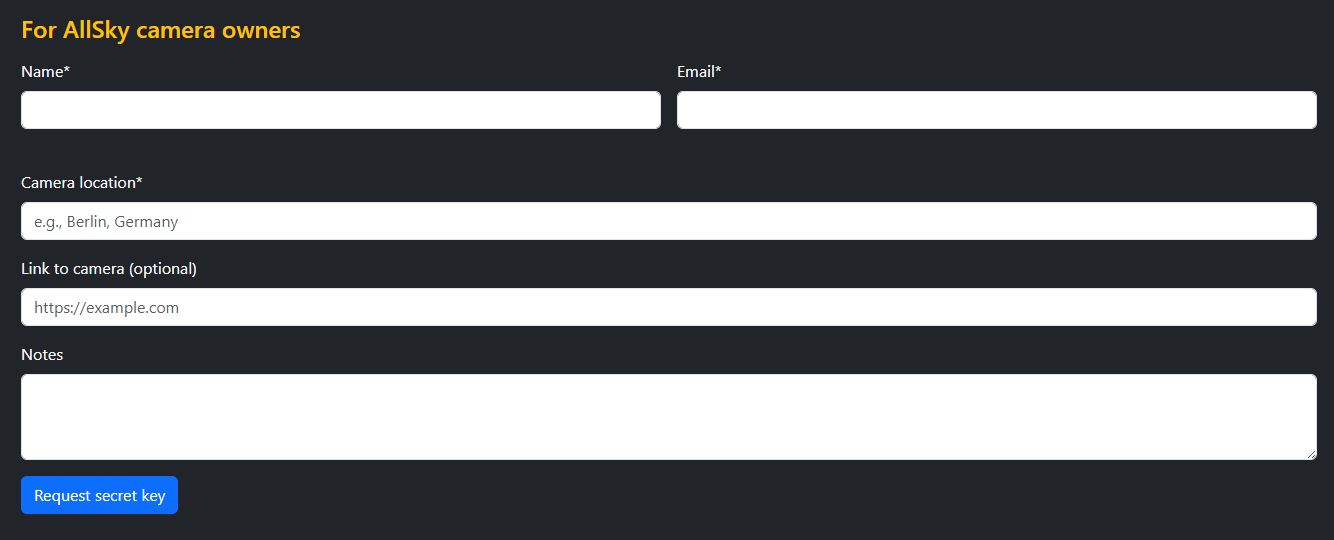
Apply for a secret key
Camera owners can apply for a secret key using the form on the join page.
- Name and email address of the camera operator.
- Location of the camera (e.g. city or region).
- Optionally, a link to the camera or website.
- Additional notes or comments.
After submitting the form, no automatic email is sent. The request is first stored and checked manually. Feedback and the secret key are then sent personally by email from gottie@web.de.
Login for camera owners
The login area is intended for camera owners in the AllSkyCamera network. After logging in, you can manage camera-related functions such as the profile page, community information and badges.
Each camera owner receives their login personally from Stefan. There is no automatic registration or account creation on the website.
How login works
- Open the login page.
- Enter your username and password.
- After a successful login, you will be redirected to your user profile.

5. Dashboard for camera users
After logging in, you will land on the dashboard. It is the central overview for camera users and the starting point for settings, camera management, tools and exclusive functions.
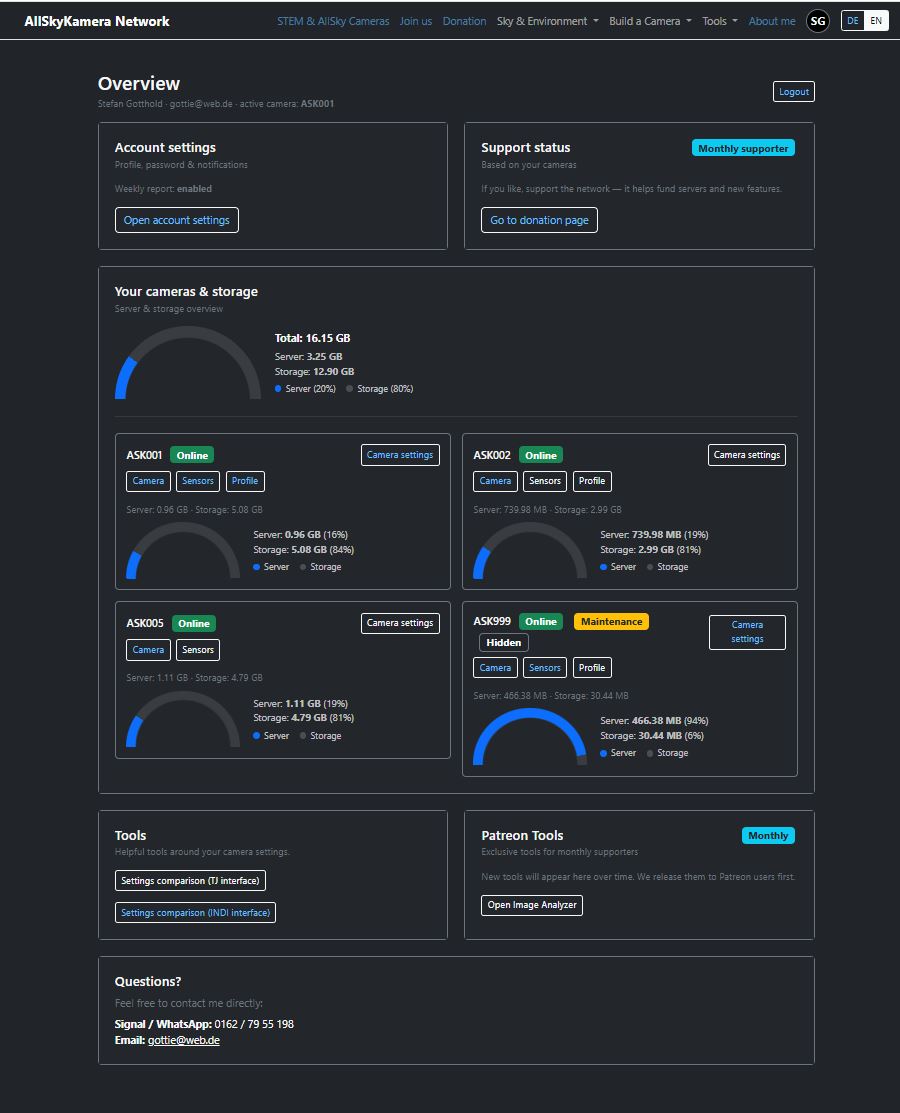
Dashboard overview
The dashboard combines the most important areas of the user account. From here, you can access the account settings, your own cameras, the camera settings, as well as internal and exclusive tools.
- Access your own account settings.
- Change password and manage other account functions.
- Enable or disable email functions and notifications.
- Display of all your own cameras if you operate multiple cameras in the network.
- Status of each camera at a glance.
- Storage overview for server and storage area.
- Direct access to the camera settings of each camera.
- Special tools that are not publicly available.
- Helpful tools for settings and management of your own camera.
- Central entry points to internal tools of the network.
- Patreon supporters get access to exclusive functions from here.
- These tools are reserved exclusively for monthly supporters.
- The dashboard shows which exclusive areas are unlocked.
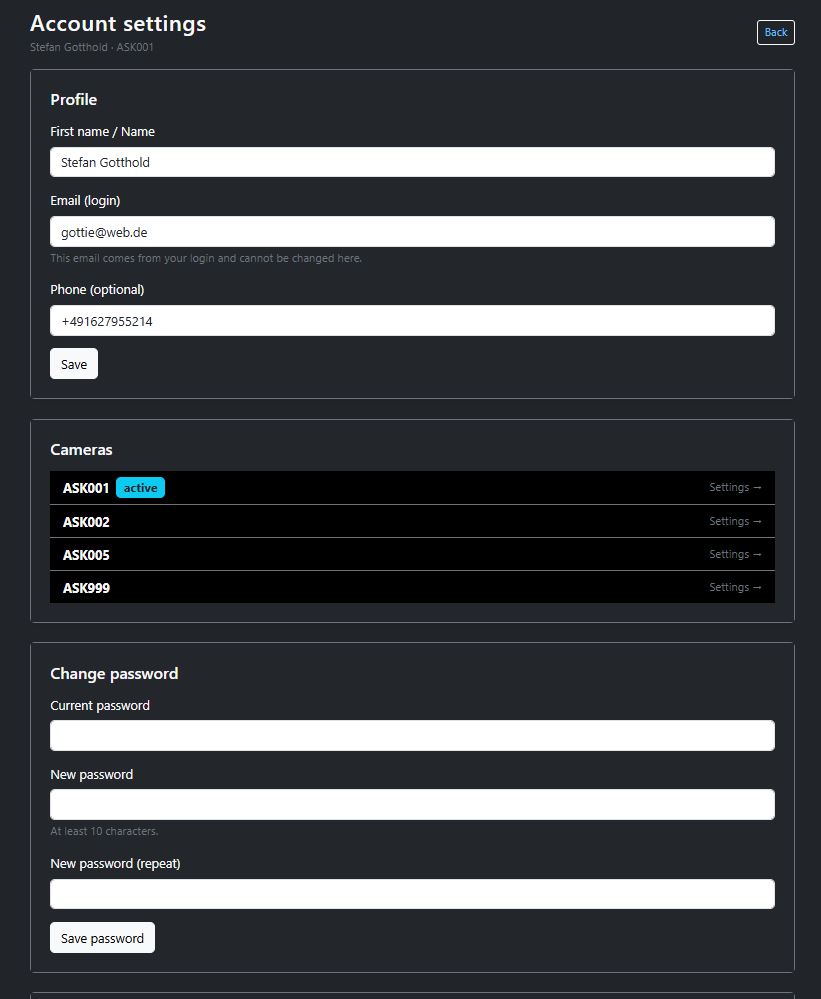
Account settings
In the account settings, you manage your personal account data, the active camera, your password, notifications, usage permissions, as well as your supporter status and available badges.
- First name or account name.
- Login email address.
- Optional phone number.
- Overview of all cameras assigned to the account.
- Marker for the currently active camera.
- Direct access to the respective camera settings.
- Enter current password.
- Set and confirm a new password.
- Save the change directly in the user account.
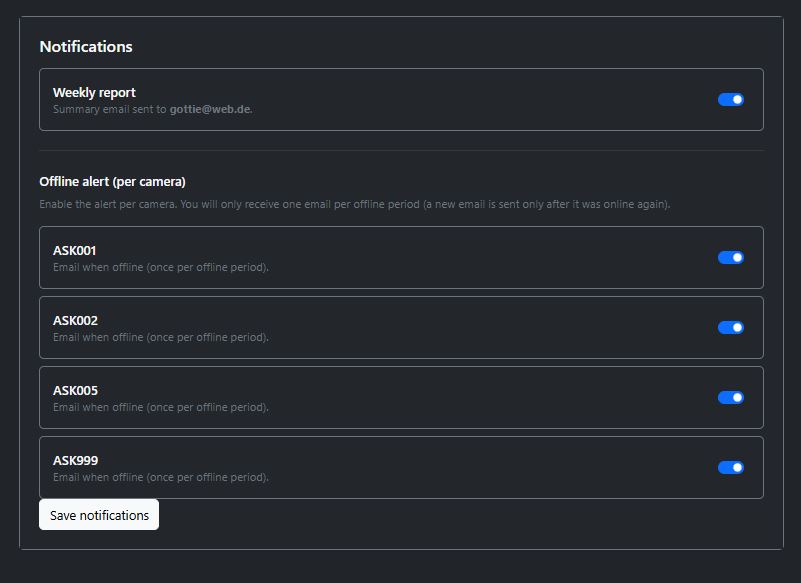
- Enable or disable the weekly report by email.
- Control the offline alarm individually for each camera.
- Save and adjust notifications centrally.
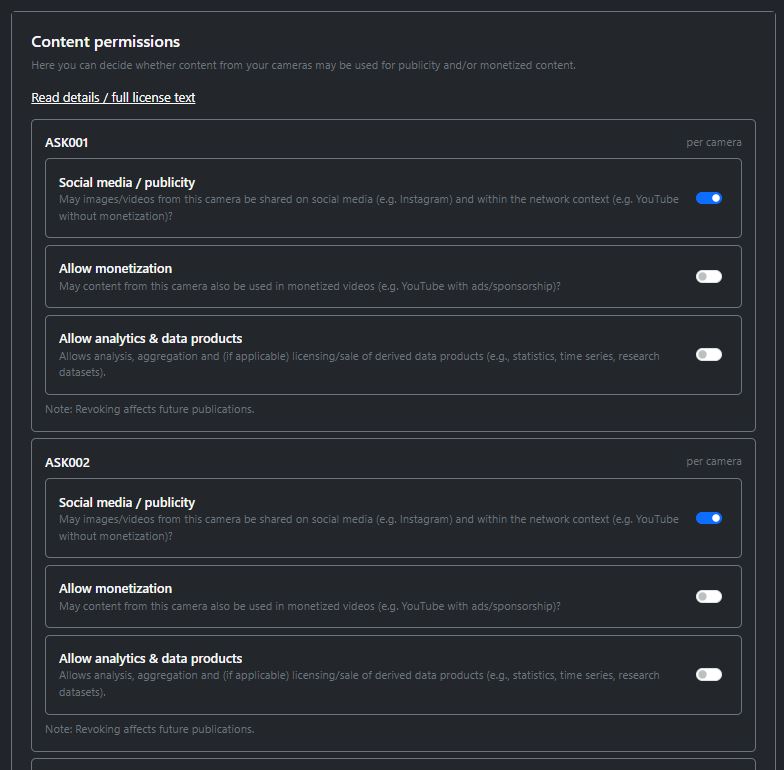
- Permission for social media and public communication.
- Permission for monetization of content.
- Permission for analysis and derived data products.
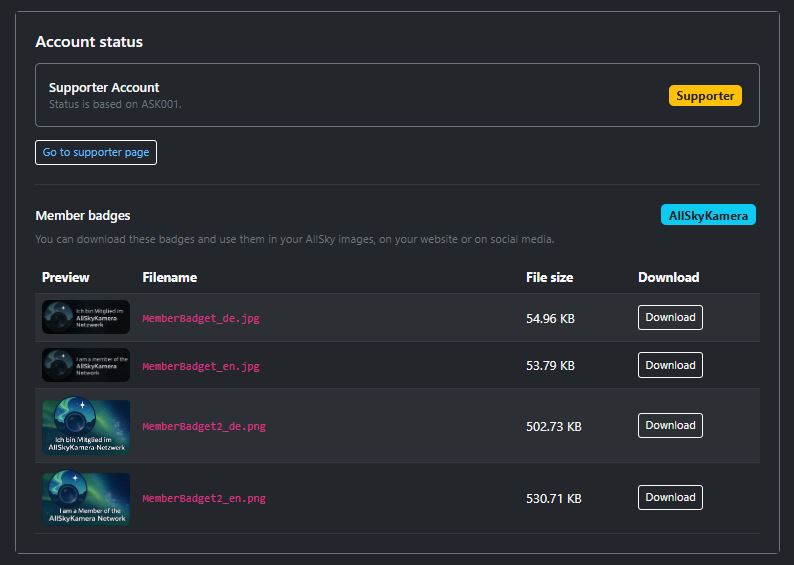
- Display of the current account status, e.g. Supporter.
- Availability of member badges for download.
- Use of badges for website, social media or all-sky images.
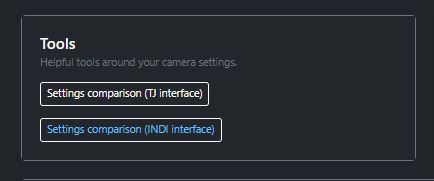
Tools for camera users
Additional tools are available in the dashboard for logged-in camera users. These tools help with analysis and configuration of your own AllSkyCamera and are not publicly visible.
Examples of available tools
- Settings comparison for camera settings (e.g. TJ interface).
- Settings comparison for INDI-based cameras.
- Additional technical tools related to camera configuration and analysis.
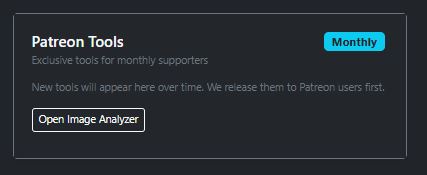
Patreon tools
Monthly supporters of the AllSkyCamera network receive access to additional exclusive tools. These functions are available only to supporters and are marked accordingly in the dashboard.
Exclusive functions can include, for example
- Special analysis tools for all-sky images.
- Advanced image or data analysis.
- New experimental features that are first made available to supporters.
Which Patreon tools are available may expand over time. New functions are often released first for monthly supporters.
9. User tools
The user tools section provides utilities that help logged-in camera users compare settings, understand configurations or analyze images.
TJ Settings Tool
The TJ Settings Tool helps compare and understand settings for cameras with a TJ interface.
Typical functions
- Comparison of camera settings.
- Better assessment of individual parameters.
- Support in optimizing your own camera.
INDI Settings Tool
The INDI Settings Tool supports the comparison of camera settings for INDI-based all-sky systems.
Typical functions
- Comparison of INDI settings.
- Support for camera configuration.
- Analysis of the effects of individual parameters.
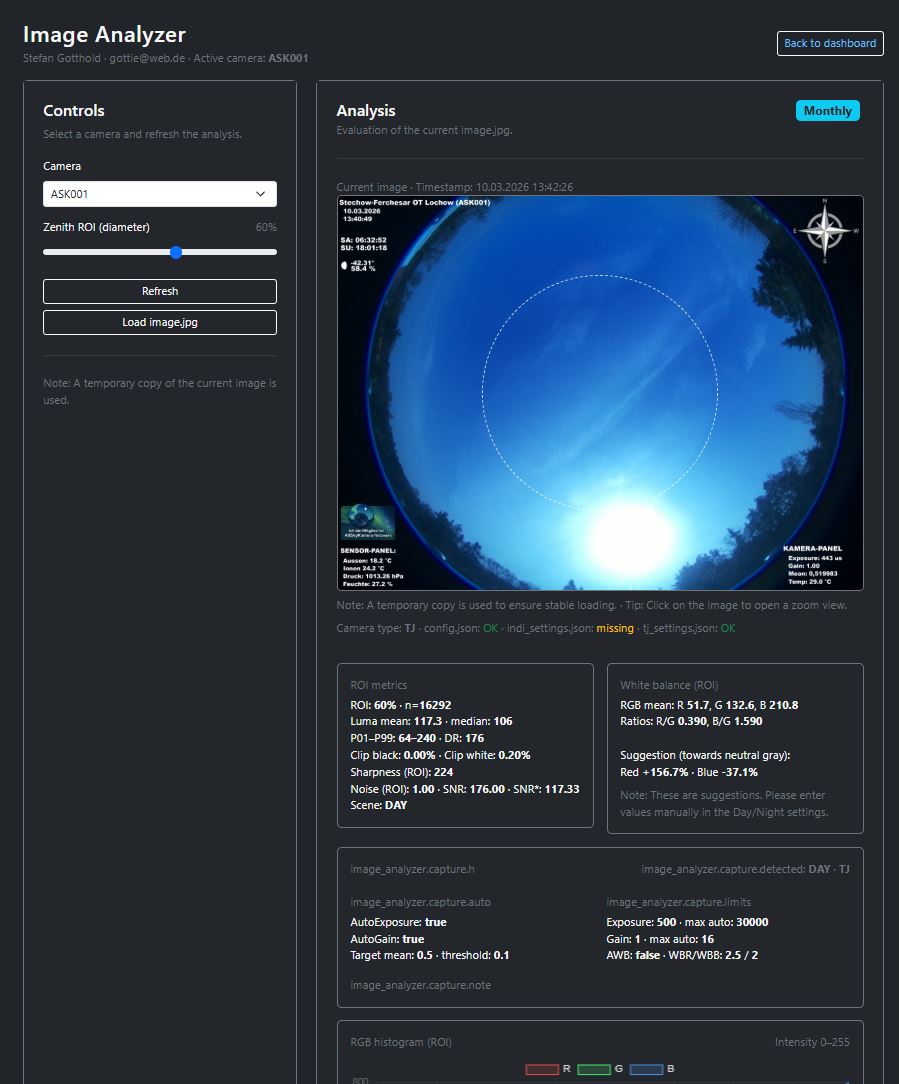
Patreon Image Analyzer
The Image Analyzer is an exclusive tool for monthly supporters. It allows technical analysis and evaluation of all-sky images.
Typical functions
- Analysis of image brightness and histogram.
- Examination of individual image areas.
- Technical evaluation of camera images.
The Image Analyzer is available exclusively to monthly supporters.
10. Camera settings
In the camera settings, you manage all camera-related contents and functions. These include basic information, profile, sensors, highlights and data management.
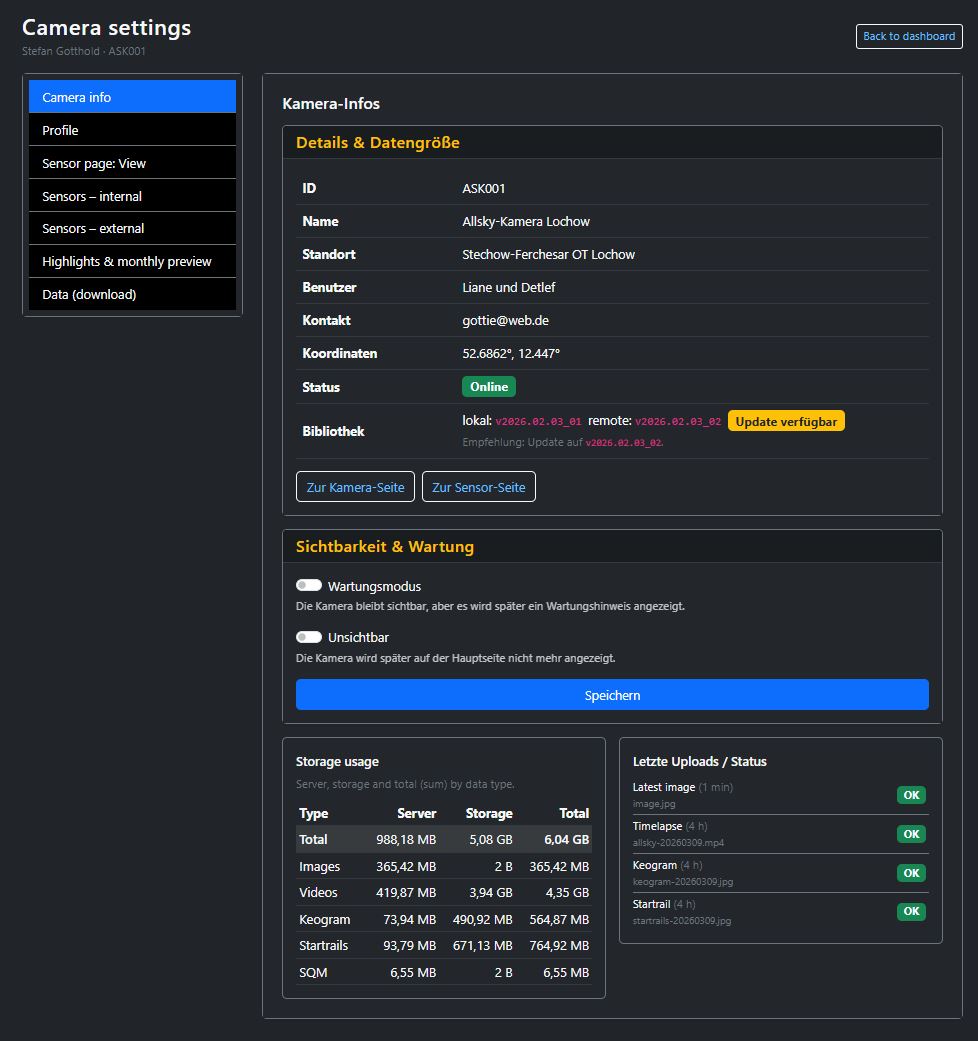
Camera info
In the camera info section, you will find the most important master data and status information about your camera.
Typical contents
- ID, name, location and coordinates of the camera.
- Status information such as online status, maintenance mode or visibility.
- Links to the public camera and sensor page.
- Storage usage and current upload status.
This section serves as a central overview of the technical and public status of your camera.
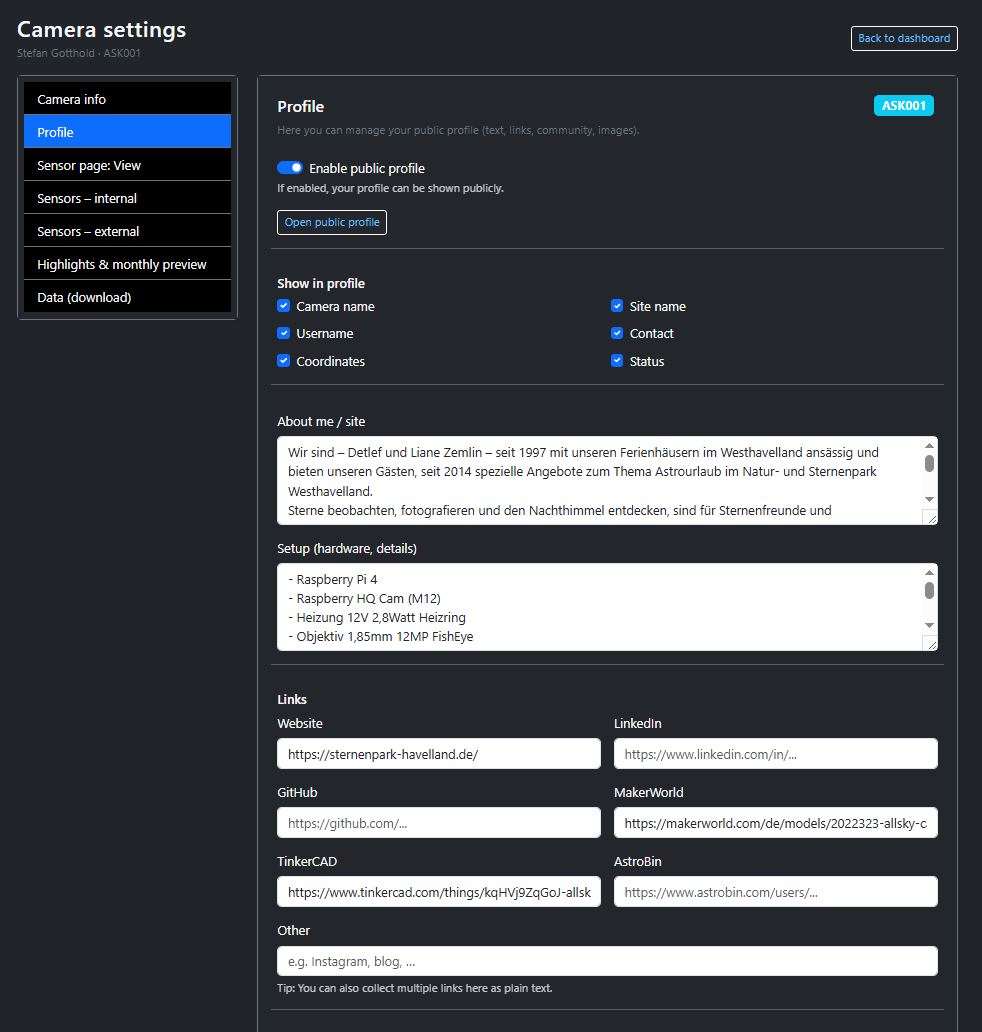
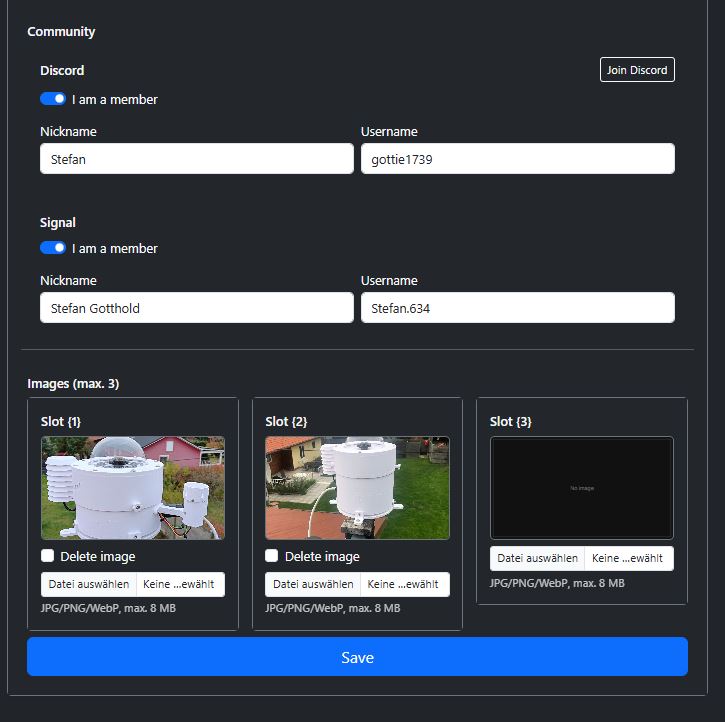
Profile
In the profile section, you manage the public contents of your camera, such as description, setup, images and links.
Typical contents
- Activation and maintenance of the public profile.
- Texts, images and links related to the camera.
- Presentation of the setup and community information.
Sensor page: view
Here you define which sensor blocks and information should be displayed on the public sensor page.
Typical contents
- Control of the visible blocks on the sensor page.
- Influence on the public display of sensor data.
- Adjustment of order and visibility depending on the camera setup.

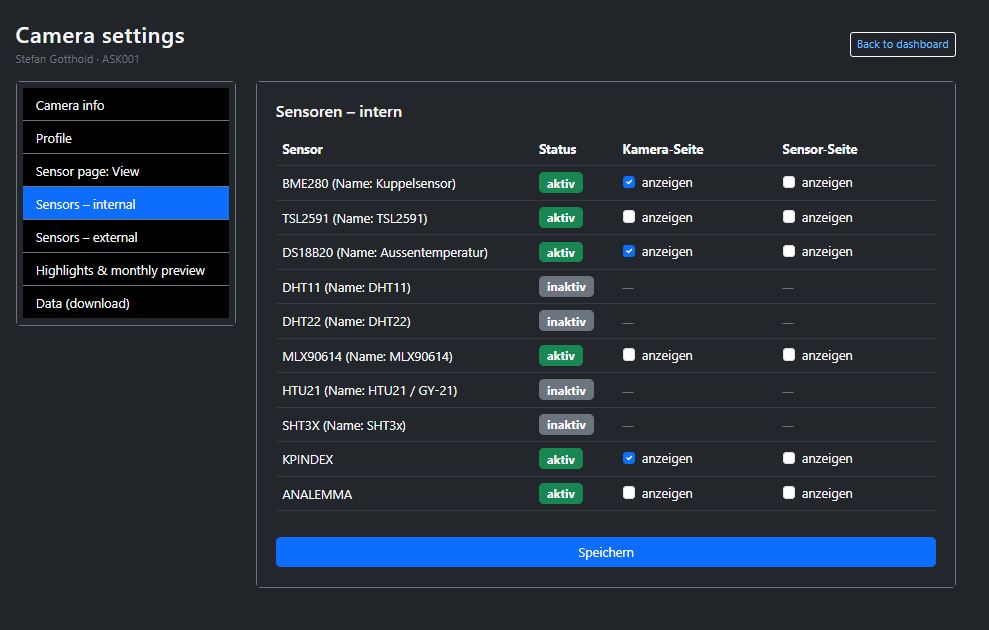
Sensors – internal
The internal sensors section shows the sensors that are operated directly on the camera or the Raspberry Pi.
Typical contents
- Overview of available internal sensors.
- Status and activation of individual sensors.
- Control of the public display of these measured values.
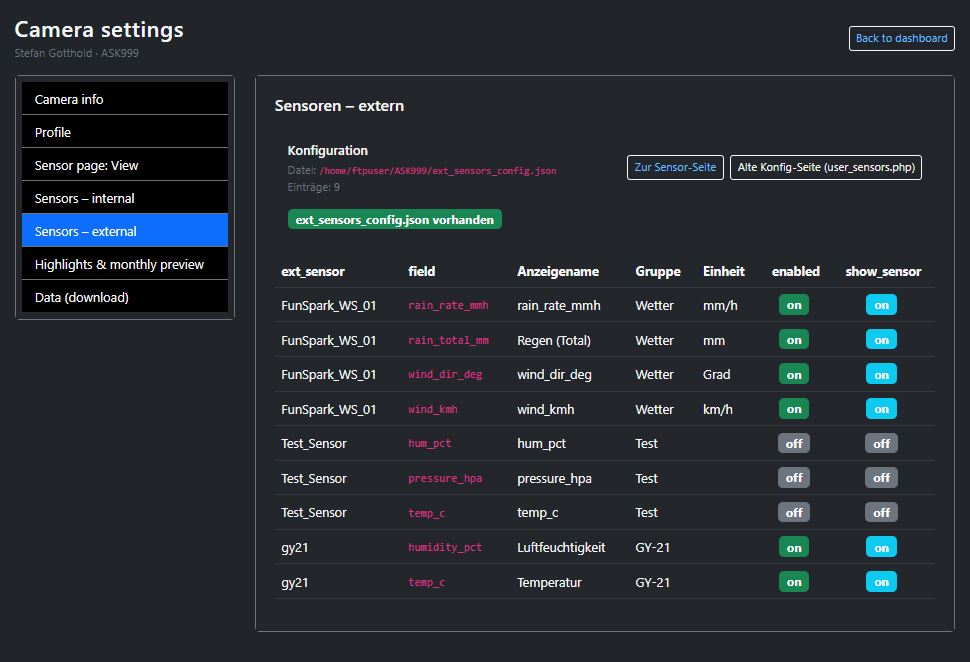
Sensors – external
In the external sensors section, additional measurement systems are managed that are connected to the camera via the API or other external sources.
Typical contents
- Overview of connected external sensors.
- Status and assignment of external data sources.
- Control of the display on the sensor page.
External sensors require a correct API connection and valid assignment to the camera.
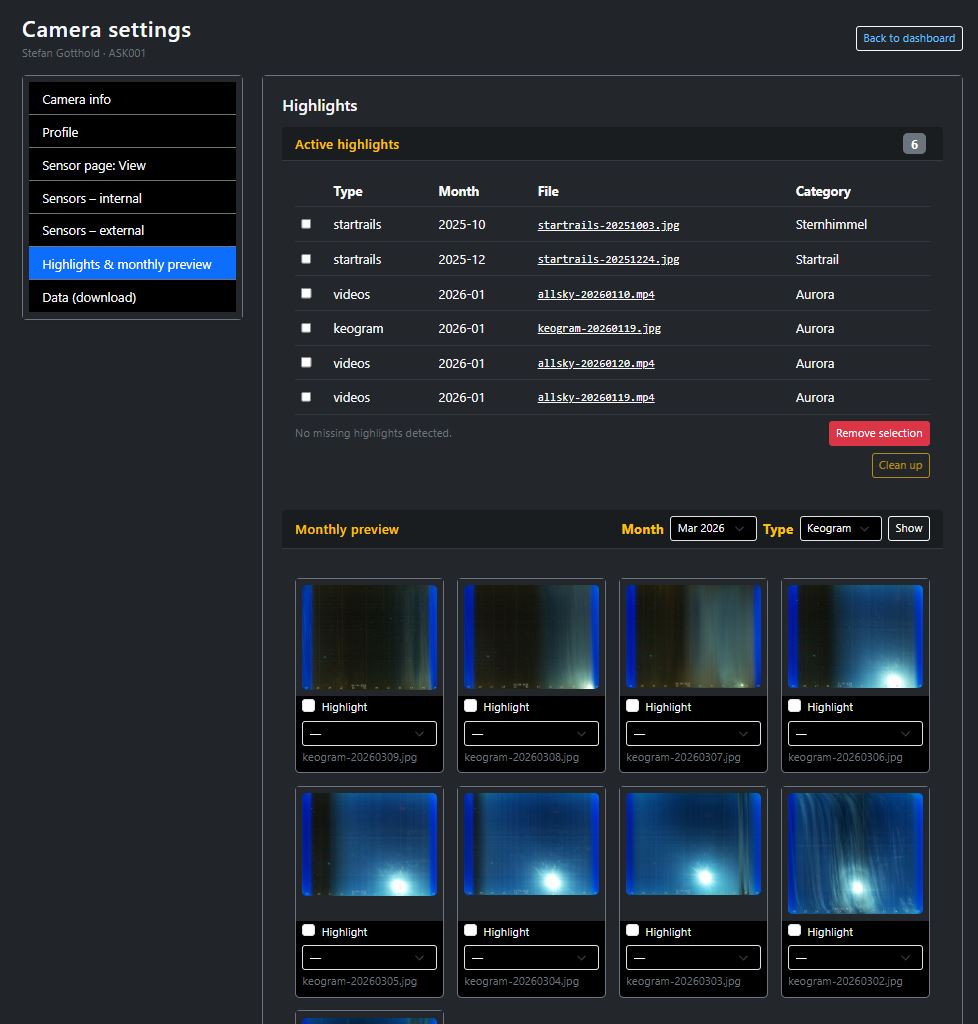
Highlights & monthly preview
Here you manage your camera’s highlights and can emphasize special images or data products.
Typical contents
- Selection of special images or data products.
- Marking and categorization of highlights.
- Monthly overviews for selecting new highlights.
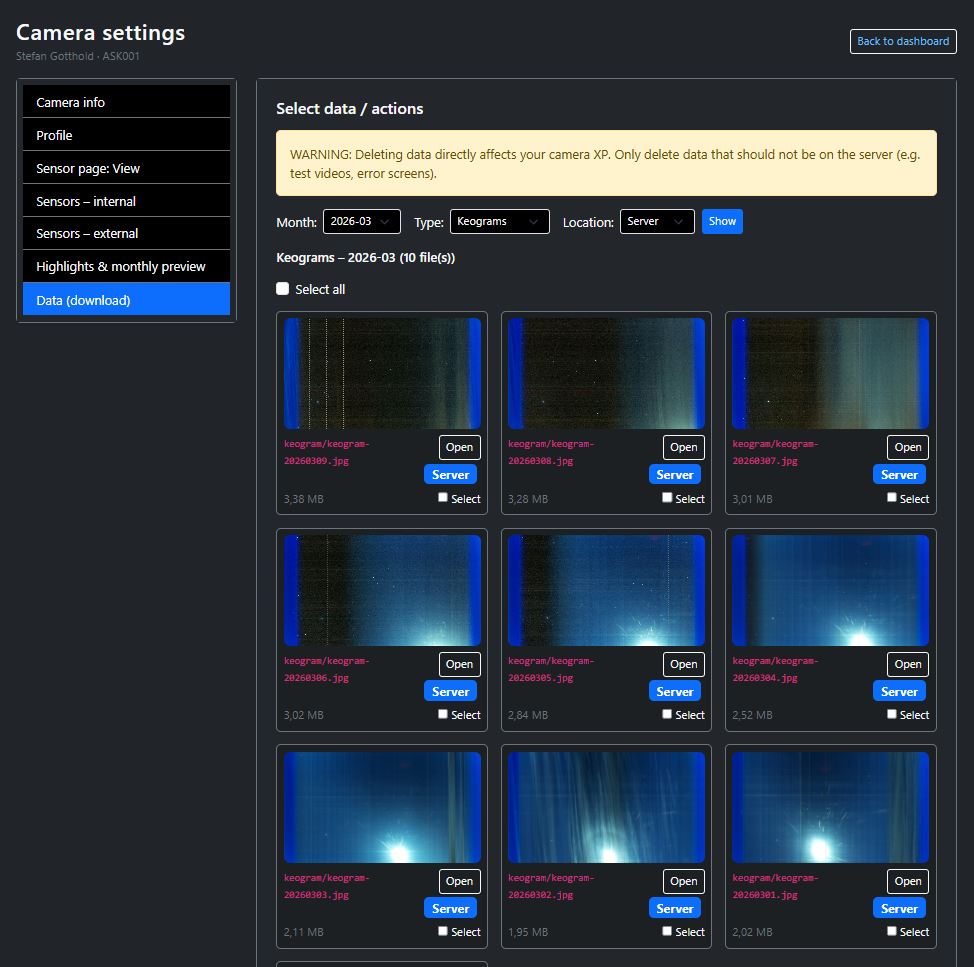
Data (Download)
In the data section, you can filter existing files, select them and download them together or manage them.
Typical contents
- Selection of files by type and time period.
- Download of multiple selected contents.
- Management of existing camera data.
Depending on the function, changes or deletion processes may affect your camera’s data set.
Services of the AllSkyCamera network
The AllSkyCamera network offers much more than simply displaying sky images. Camera operators benefit from a wide range of technical, organizational and community services.
Client-side services (camera)
A central, open Python library is available for all cameras in the network.
- Upload of images, videos and metadata
- Unified sensor handling (internal & external)
- Calibration and test scripts (e.g. SQM / TSL2591)
- Diagnostic and support scripts for camera operation
Project on GitHub: github.com/gottie29/AllSkyKamera
Server-side services
The server infrastructure of the network handles storage, processing and preparation of camera data.
- API for external sensors (with secret key)
- Automatic creation of keograms
- Long-term keograms (monthly overviews)
- Startrails from nighttime images
- Automatic daily, monthly and yearly videos
Public presentation & integration
All cameras receive their own public camera and sensor page.
- Public camera & sensor pages
- Map view of the network
- Highlights to showcase special events
- Easy integration of images & videos into your own website
Community & network
The AllSkyCamera network is a collaborative project.
- Exchange about hardware, sensors & calibration
- Collaborative development of software & concepts
- Official member badges for camera operators
Many of these services run fully automatically in the background and require no additional configuration by camera operators.